





In this article
You spent an afternoon labeling every container in your pantry. Two weeks later, the flour label curled off the jar and stuck to the shelf liner. The one on the rice container turned into a gummy smear you had to scrape off with your fingernail. Sound familiar?
I’ve relabeled my own pantry three times before figuring out what actually makes labels last. The problem isn’t the brand you bought — it’s a combination of moisture, surface prep, and choosing the wrong label type for the wrong container. This guide covers why labels fail, which methods hold up longest, how to apply them so they stay, and how to build a system that handles the inevitable moment you switch from quinoa to oats.
Quick Answer: Most pantry labels peel because moisture cycles inside closed containers break the adhesive bond. To fix it:
- Wipe every container with rubbing alcohol before applying
- Use waterproof vinyl or laminated tape — not paper stickers
- Set font size to 22pt minimum in a sans-serif typeface
- Use permanent labels for staples, chalkboard labels for items that rotate
- Check labels once a month during your pantry reset
Why Pantry Labels Peel (and It’s Not the Brand)
The Moisture Cycle Inside Your Containers
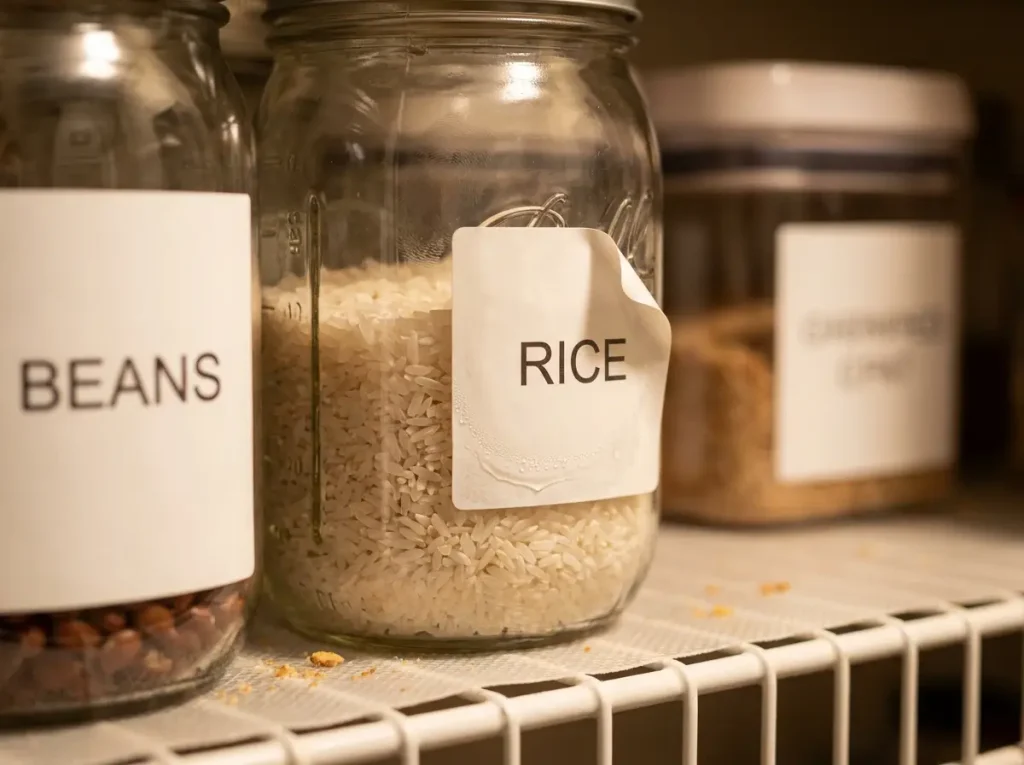
Every time you open a container of flour or sugar, warm kitchen air rushes in. When you close the lid, that air cools. The temperature difference creates a thin film of condensation on the container walls — including the spot where your label sits.
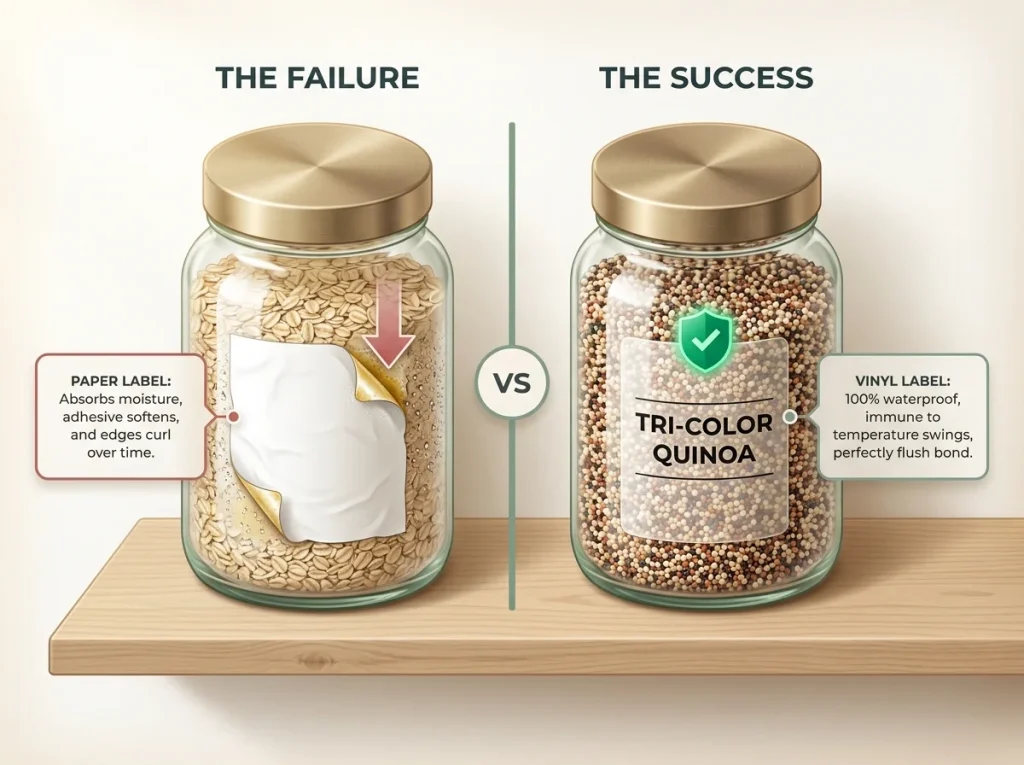
Paper-based labels absorb that moisture. The adhesive softens. The edges lift. Within a few weeks, the whole label curls off or turns into a sticky residue.
This cycle happens faster in warm kitchens, near the stove, or if your pantry sits against an exterior wall with temperature swings. Glass containers show it worst because glass holds temperature longer than plastic, so the condensation cycle is more pronounced. If you’re still choosing containers, the material matters for labeling too — our guide to the best pantry storage containers breaks down which surfaces hold labels longest.
Pro tip: If your labels keep failing on glass jars specifically, the jar surface is likely too cold when you apply the label. Let the jar sit at room temperature for an hour before labeling. Warm glass bonds adhesive better than cold glass.
Surface Contamination You Can’t See
The second reason labels fail has nothing to do with the label itself. It’s what’s on the container surface. Cooking oils, fingerprints, flour dust, and residue from old label adhesive all create a barrier between the new label and the container. The label looks stuck when you press it on. A week later, it slides off because it bonded to a film of oil, not to the actual surface.
The Wrong Label for the Wrong Material
Paper sticker labels on plastic containers. Vinyl labels on textured surfaces. Chalk marker directly on porous materials. Every mismatch shortens the label’s life. The material of your container determines which label type will actually hold — and most label sets don’t tell you this on the packaging.
Five Label Methods Ranked by How Long They Last
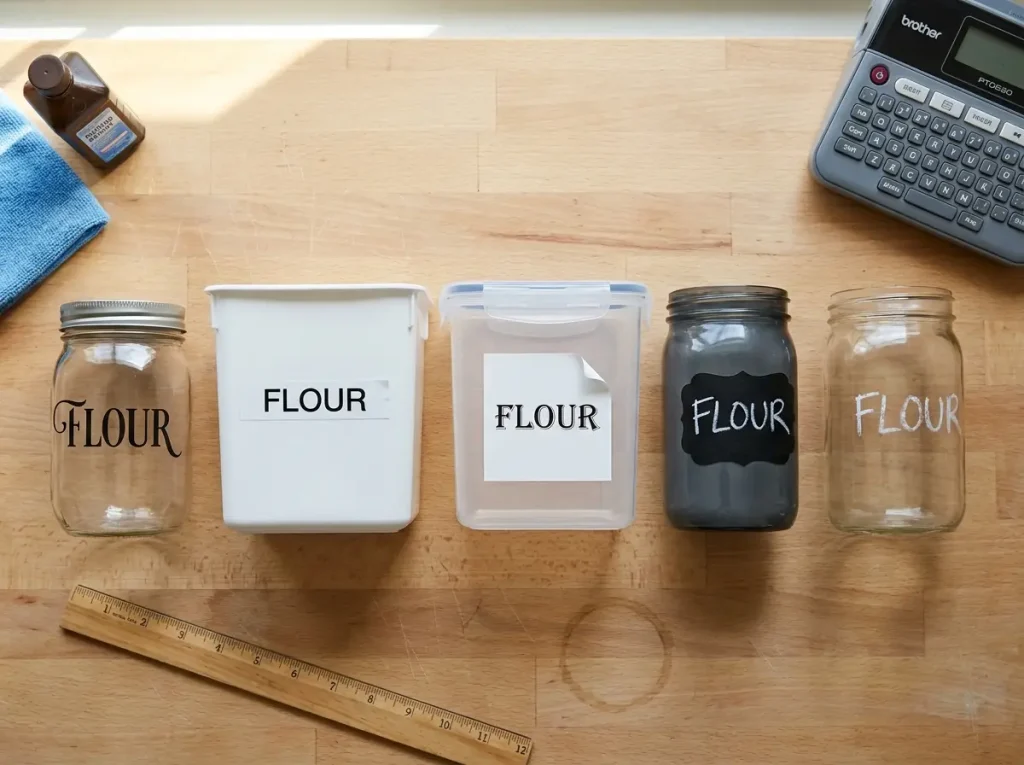
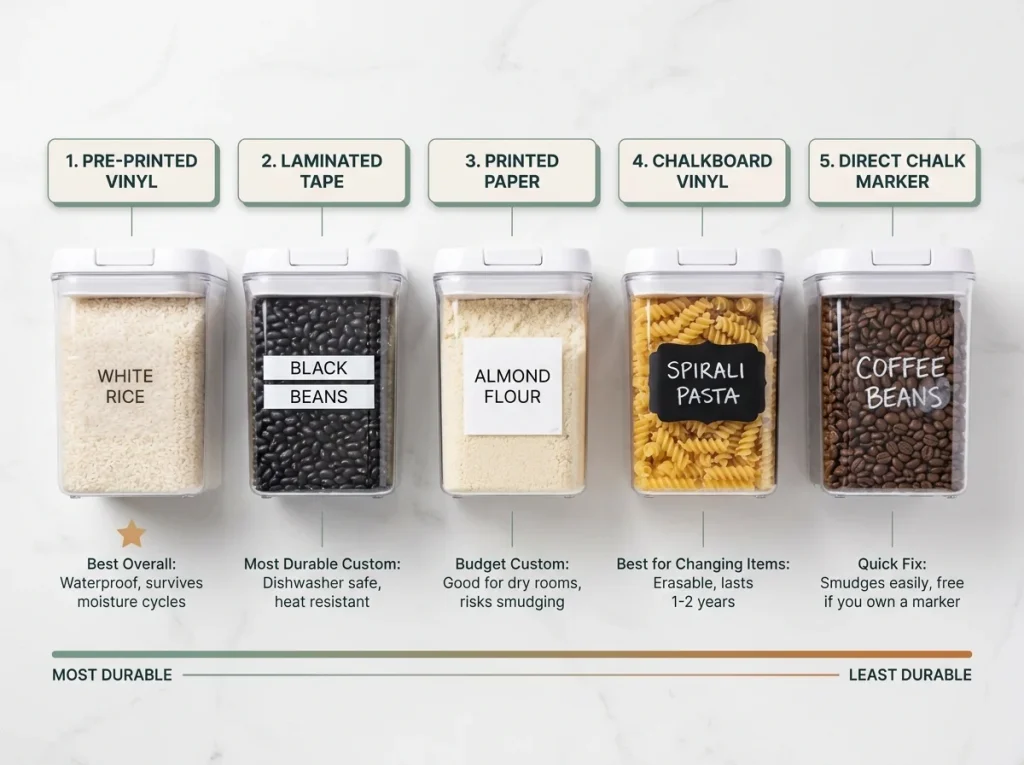
Here’s how the five most common pantry labeling methods actually perform after months of daily use — not how they look on day one.
Pre-Printed Vinyl Sticker Labels (Best Overall)
Waterproof vinyl with pre-printed text is the lowest-effort option that actually lasts. The Talented Kitchen 157-Piece Pantry Label Set ($10) comes with 157 pre-cut labels covering everything from “All Purpose Flour” to “Chia Seeds.” The clear vinyl blends into any container, and the adhesive survives the moisture cycle that destroys paper labels.
The limitation: you get what’s printed. If your pantry has specific items not in the set — a particular spice blend, a bulk grain — you’ll need a second labeling method for those. The v2croft 168-Piece set (~$9) is a slightly cheaper alternative with thinner adhesive that works fine in dry pantries but lifts faster in humid kitchens.
Label Maker with Laminated Tape (Best for Custom Text)
A dedicated label maker produces laminated tape labels that outlast everything else on this list. The Brother P-Touch PTD220 ($35) prints on TZe tape that’s waterproof, heat-resistant, and dishwasher-safe. I’ve had Brother labels on containers that went through three years of weekly use without a single edge lifting.
The upfront cost is higher, but the Brother TZe-231 replacement tape ($13 for a 2-pack) gives you 52 feet of labels — enough to label your entire kitchen twice. If $35 feels steep, the Dymo LetraTag LT-100H (~$22) uses non-laminated tape that works in dry pantries but doesn’t survive humid conditions as well. For more budget-friendly labeling setups, our pantry organization on a budget guide covers label options under $15.
DIY Printed Sticker Paper Labels (Budget Custom Option)
If you want custom fonts and designs but don’t want a label maker, printable sticker paper through a home printer is the middle ground. The Avery Removable Labels 6460 ($15 for 750 labels) work with any inkjet or laser printer, and the Avery Design & Print app gives you free templates.
The catch: inkjet-printed labels smear if they get wet. Laser-printed labels hold up better but still can’t match vinyl or laminated tape for longevity. These work best for dry goods in a climate-controlled pantry. If your kitchen runs warm or your pantry sits in a tight space with limited airflow, skip this method.
Chalkboard Labels (Best for Items That Change)
Chalkboard vinyl labels let you erase and rewrite with a chalk marker whenever you swap container contents. They work well for snack bins, bulk items you buy differently each month, and anything that rotates seasonally.
The downside: chalk marker text isn’t as crisp as printed labels, and the writing can smudge if you brush against it while reaching for something on the shelf. They’re best used as part of a hybrid system — permanent vinyl for staples, chalkboard for everything else.
Chalk Marker Directly on Glass (Free but Limited)
Writing directly on glass containers with a white chalk marker costs nothing if you already own a marker. It wipes clean with a damp cloth and works in a pinch.
The problems: it only works on glass or dark plastic (invisible on clear plastic), it smudges easily, and the text never looks as clean as a proper label. This is a stopgap, not a system.
How to Apply Labels So They Actually Stick
Surface Prep Is the Whole Game
The single most important step in labeling has nothing to do with the label. Wipe every container surface with rubbing alcohol (isopropyl 70% or higher) and a microfiber cloth before applying anything. This strips oils, dust, old adhesive residue, and fingerprints that prevent bonding.
Don’t use soap and water — soap leaves a film. Don’t use glass cleaner — most contain silicone that repels adhesive. Rubbing alcohol evaporates clean and leaves zero residue. One pass, let it dry for 30 seconds, then apply.
Application Technique That Prevents Edge Curl
Press the label center first, then smooth outward toward the edges with your thumb or a credit card. This pushes air bubbles out instead of trapping them underneath. Air bubbles are where peeling starts — the adhesive isn’t making contact in those spots, so the first moisture cycle lifts the edge.
For curved containers like mason jars, apply the label to the flattest section of the curve. Vinyl labels flex slightly, but paper labels will wrinkle on any surface with more than a gentle curve.
Pro tip: After applying, press a warm (not hot) dry cloth over the label for 10 seconds. The gentle heat activates the adhesive and improves the initial bond. This alone can add months to a paper label’s lifespan.
Placement That Survives Daily Use
Put labels where your hand doesn’t go. The front-center of a container seems obvious, but that’s also where you grab it. Every grab flexes the container wall slightly, which loosens adhesive over hundreds of repetitions. Place labels on the upper third of the container front — above your natural grip line — and they’ll outlast labels placed at hand height.
For bins and baskets, clip-on label holders or tag-style labels beat adhesive labels entirely. No adhesive to fail, easy to swap, and they move with the bin if you reorganize.
Font, Size, and Contrast That Work at Shelf Distance
The 22-Point Rule
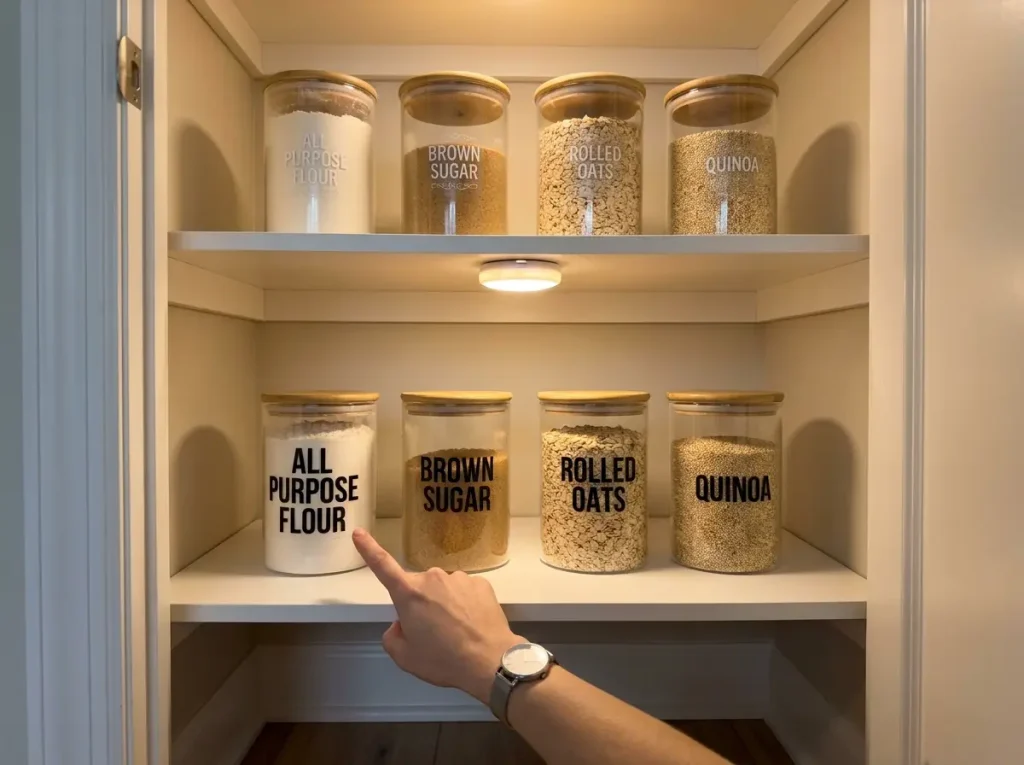
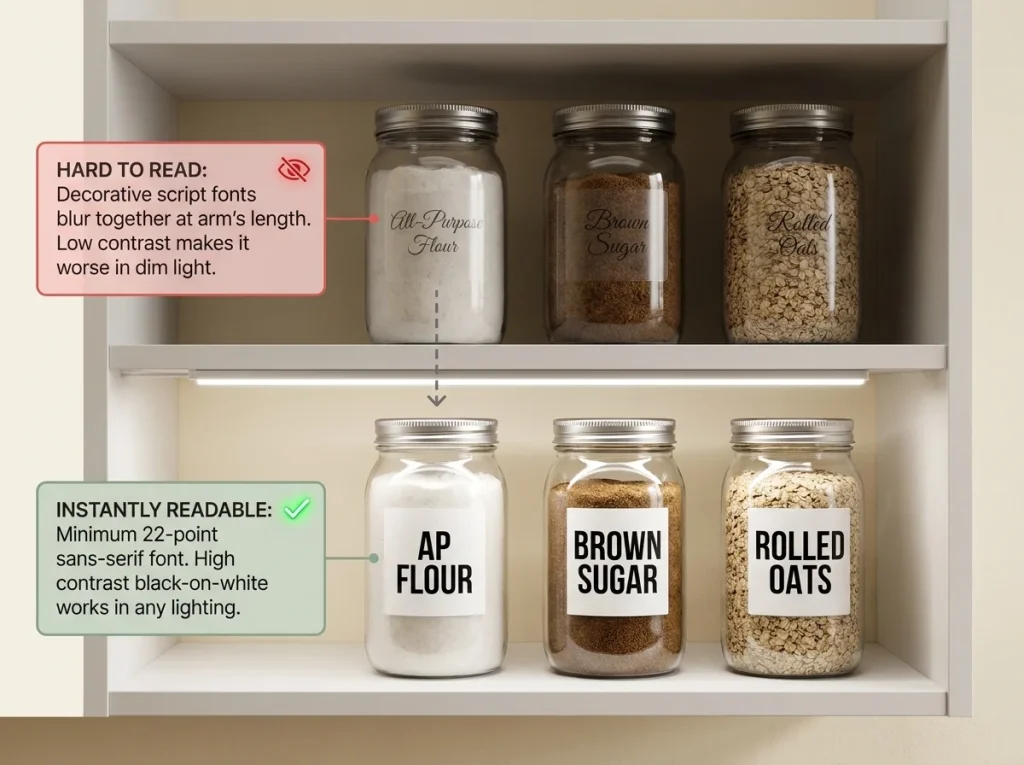
Stand at arm’s length from your pantry shelf. Can you read every label without leaning in or squinting? If not, your font is too small. The minimum readable size at typical shelf distance (18-24 inches from your eyes) is 22-point equivalent in a sans-serif typeface like Helvetica, Arial, or the default on most label makers.
Script fonts, cursive, and decorative typefaces look beautiful on Pinterest. At shelf distance, they blur together. Your pantry is not a wedding invitation — prioritize readability. A label you can’t read at a glance is a label that doesn’t work.
Contrast That Beats Bad Lighting
Most pantries have terrible lighting — a single overhead bulb, maybe a dim LED strip if you’re lucky. Low contrast labels disappear in low light. Black text on white or clear background is the universal winner. It reads in any light condition, against any container color, with any contents behind it.
Avoid gray text on clear labels (disappears against light-colored contents like flour), white text on clear labels (invisible against rice or sugar), and pastel-colored labels that look great in daylight but vanish when the pantry light is a warm 2700K bulb.
Pro tip: If your pantry has no built-in light, stick a battery-powered LED puck light ($8 for a 3-pack) to the underside of each shelf. Motion-activated versions turn on when you open the door. This single upgrade makes every label in your pantry readable — and you’ll stop pulling out the wrong container at 6 AM.
How Much Information to Put on a Label
Label the contents. That’s it. You don’t need the purchase date, the expiration date, the store you bought it from, and a serving suggestion. For dry pantry staples that you refill regularly — flour, sugar, rice, oats, pasta — one word is enough. For items that genuinely expire or that look identical to each other (is that baking soda or baking powder?), add one qualifier.
Good labels: “AP Flour” · “Brown Sugar” · “Baking Powder” · “Chia Seeds”
Over-labeled: “King Arthur All Purpose Flour — Purchased 3/15 — Use by 9/15 — 5 cups remaining”
The more text on a label, the smaller the font has to be, and the harder it is to read at shelf distance. Keep it to three words maximum.
The Relabeling Problem (and How to Design for Change)
Why Your System Needs to Handle Swaps
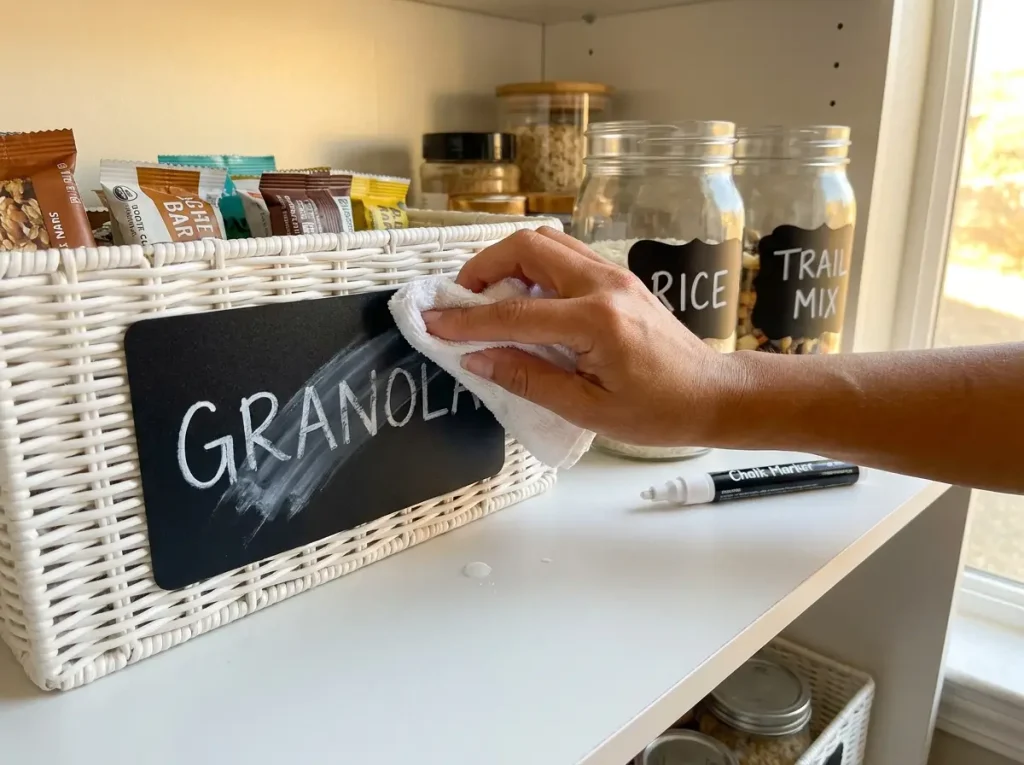
Here’s the part most labeling guides skip: pantry contents change. You buy quinoa for a month, then switch to farro. The bulk bin that held trail mix now holds granola. If every label is permanent, you’re either scraping off old labels every time contents change or living with a jar of “QUINOA” that actually contains rice.
A labeling system that only works on day one isn’t a system. It’s a decoration.
The Hybrid Method: Permanent + Erasable
The most practical pantry labeling system uses two label types simultaneously:
Permanent vinyl labels for items that never change — all-purpose flour, sugar, salt, rice, pasta, cooking oil. These are your staples. They go in the same container every time you refill. Use the Talented Kitchen vinyl set or a label maker for these. Apply once and forget about them for years.
Chalkboard vinyl labels ($8 for a 192-pack with removable adhesive) for items that rotate — snacks, bulk buys, seasonal items, anything you cycle through. Write on them with a Chalky Crown chalk marker ($9 for a 5-pack with 3mm fine tips). When the contents change, wipe with a damp cloth and rewrite. No scraping, no residue, no new label needed.
This hybrid approach means you’ll never relabel your flour jar (permanent) but you can update the snack bin every time you buy something different (erasable). It takes the best trait from each method and eliminates the weakness of committing to just one.
Monthly Label Check (Two Minutes, Every Reset)
Add a label scan to your monthly pantry reset. It takes two minutes:
Walk the shelves. Check for lifting edges on permanent labels — press them back down or replace if the adhesive is shot. Check that chalkboard labels still match the actual contents (you’d be surprised how often “granola” sits in front of a container of pretzels). Wipe and rewrite any that are wrong.
This quick check prevents the slow drift where labels become meaningless because they haven’t been updated in months. A labeling system without maintenance is just stickers on jars. The National Association of Productivity and Organizing Professionals recommends labeling as a core practice in any organizational system — but consistently emphasizes that the maintenance habit matters more than the label product you choose.
Pro tip: Keep a chalk marker and a spare sheet of vinyl labels inside your pantry door or in the closest drawer. If you can relabel in the moment — right when you refill a container with something new — you’ll actually do it. If it requires finding supplies, you won’t.
Conclusion
Three things determine whether your pantry labels survive past the first month: the label material (waterproof vinyl or laminated tape, not paper), the surface prep (rubbing alcohol wipe before every application), and the font size (22pt sans-serif minimum so you can actually read them at shelf distance).
Three-Month Check: Revisit your labels after three months of daily use. Any permanent labels lifting at the edges need replacement — the adhesive has failed and pressing them down is temporary. Any chalkboard labels that haven’t been updated in three months probably don’t match their containers anymore. Fix both in one pass.
Start with the containers you use most — flour, sugar, rice, whatever you reach for daily. Get those five labels right. If the system holds after a month, expand to the rest of the pantry. Don’t label everything in one marathon session and hope it sticks.
Q1 What is the best label for pantry jars?
Waterproof vinyl sticker labels or laminated label maker tape last the longest on pantry jars. Both survive the moisture cycles that destroy paper labels. Pre-printed vinyl sets like Talented Kitchen ($10) are the easiest option for standard pantry items.
Q2 How do I label clear containers without blocking the view?
Use transparent vinyl labels with black text and place them on the upper third of the container. The clear backing lets you see the contents while the black text remains readable. Avoid placing labels in the center where your hand grabs the container.
Q3 Do chalkboard labels actually stay on pantry containers?
Chalkboard vinyl labels with quality adhesive last 1-2 years on clean, dry containers. The label itself stays — what changes is the chalk marker text, which wipes off with a damp cloth. Apply to a rubbing alcohol-cleaned surface for the strongest bond.
Q4 Should I label the container or the shelf?
Label the container whenever possible. Shelf labels only work if every container always goes back in the same spot — which rarely happens in a busy kitchen. Container labels travel with the item, so the system works even when things get moved around.
Q5 How often should I replace pantry labels?
Vinyl and laminated tape labels last 2-3 years with normal use. Paper labels need replacing every few months. Check all labels during your monthly pantry reset — press down any lifting edges and replace labels where the adhesive has fully failed.