









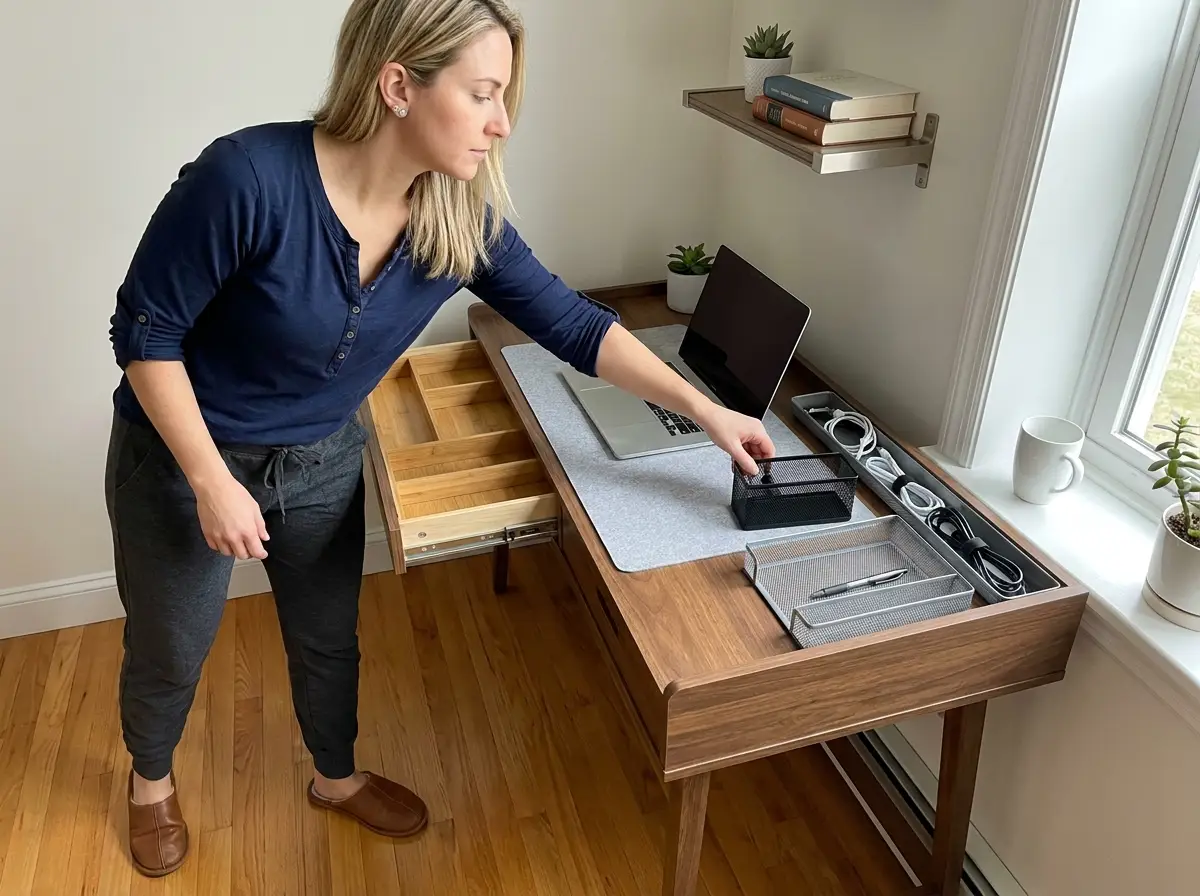
In this article
You organized your desk last month. You sorted the pens, cleared the papers, maybe even bought a new caddy. Two weeks later, the surface looked exactly like it did before — and you blamed yourself for not keeping up. The problem isn’t discipline. It’s that most desk organization advice skips the system that makes the layout stick past the first Saturday.
After setting up and resetting dozens of home office desks, the pattern is always the same: surface creep wins when there’s no zone structure holding things in place. This guide covers the full desk organization system — from the initial edit to the daily reset — so your workspace actually stays functional past the first week.
Quick Answer: Here’s how to organize a desk that stays neat:
- Edit first — remove everything and sort into act, file, and toss
- Zone your desk surface into five areas with clear boundaries
- Organize drawers by use frequency, not category
- Keep ten or fewer items on the desktop surface
- Route and label all cables before organizing the surface
- Run a five-minute daily reset to prevent surface creep
Why Your Desk Gets Messy Again (and It’s Not Your Fault)

The Surface Creep Mechanism
Your desk doesn’t go from clean to cluttered overnight. It happens one item at a time — a pen left out instead of going back in the drawer, a phone charger draped across the corner, a sticky note that was supposed to be temporary three weeks ago. This is surface creep, and it’s the single biggest reason every desk organization attempt fails by week two.
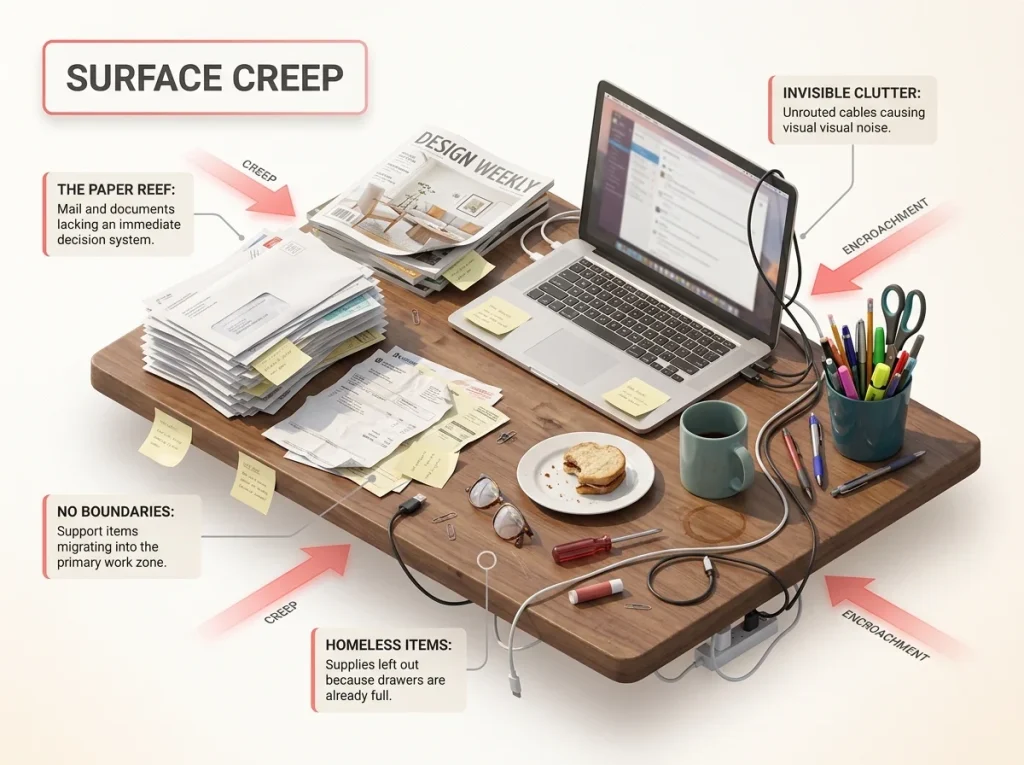
Surface creep happens because your desk has no boundaries. Without defined zones, any flat surface becomes a landing pad for whatever you’re holding when you sit down. A mail pile starts at three envelopes and grows because there’s nothing stopping it from spreading into your work area. Your coffee mug migrates half an inch to the left each morning until it’s sitting on top of a document you need.
Paper Is the Leading Culprit
Paper is the single biggest source of desk clutter. Not pens, not cables, not random office supplies — paper. A single piece of mail turns into a stack within a week if there’s no immediate decision system for incoming paper. Most people set paper down intending to deal with it “later,” and later never comes until the stack becomes a geological formation on the left side of the keyboard.
The fix isn’t a paper tray (yet). It’s a decision rule: every paper gets touched once and goes to one of three places. More on that in the paper section below.
Why “After Photos” Don’t Tell the Whole Story
Most desk organization content shows you the after photo and assumes the system will maintain itself. It won’t. Organization is a daily practice, not a weekend project. The desk that looks perfect on Sunday falls apart by Wednesday because nobody built in the reset — the five-minute routine that returns everything to its zone before the clutter compounds.
The rest of this guide builds the full system: edit, zone, organize, and maintain. Skip any layer and the desk reverts within two weeks. That’s not a guess — it’s the pattern you’ve probably already experienced.
The Edit Step — Clear Before You Spend

The Three-Category Sort
Before you buy a single organizer, pull everything off your desk and out of your drawers. Every item goes into one of three categories: act (needs action within the week), file (keep but store away), or toss (recycle, shred, or trash). This takes fifteen minutes and usually eliminates 30-40% of what was on the surface.
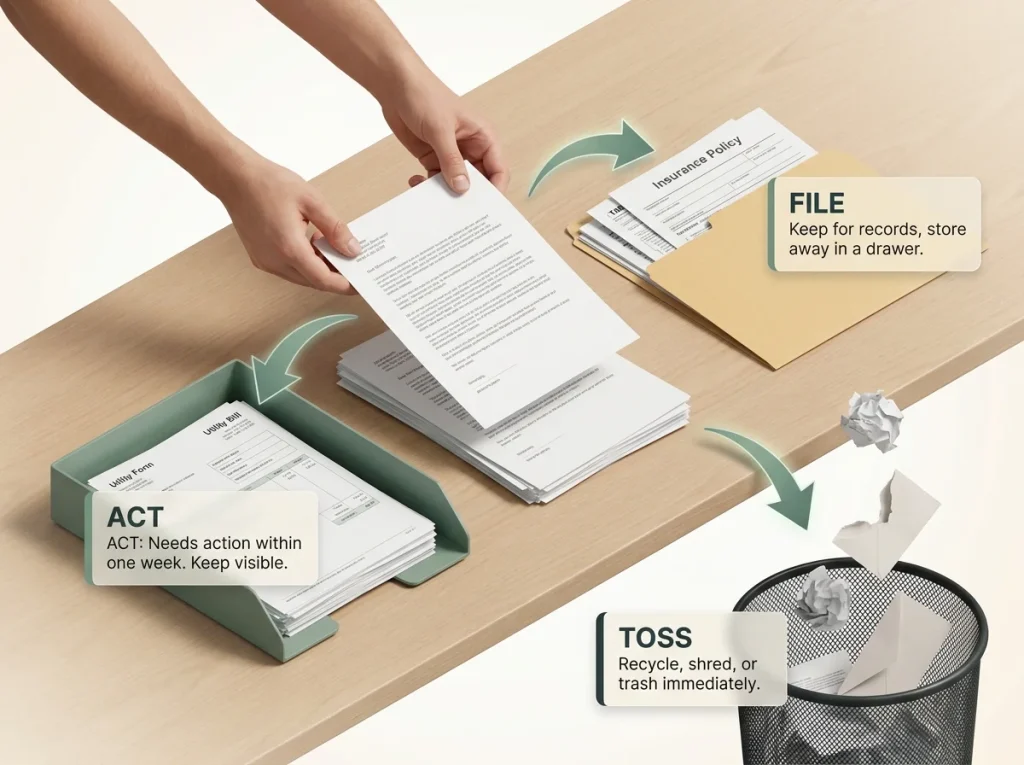
The key is speed. Don’t deliberate over each item for two minutes. If you haven’t touched something in two weeks and it’s not actively part of a current project, it either gets filed or recycled. The supplies you “might need someday” go in a box under the desk — if you don’t open that box within a month, donate the contents.
What Actually Belongs on a Desk
Most desks hold three times more than they need to. Your active workspace requires exactly what you’re using today — not this week, not this month, today. A laptop or monitor, a keyboard, maybe one notebook and one pen. Everything else earns its surface spot by how often you reach for it, and most items fail that test.
The benchmark: if you don’t reach for it at least once per workday, it goes in a drawer or off the desk entirely. Your desk is a workspace, not a storage shelf.
The Paper Decision Ahead
You’ll end this sort with a pile of paper that needs decisions. Don’t solve it now — that’s the one-touch system covered below. For now, stack the “act” papers in one neat pile and move on to zoning. The temptation is to stop and process every paper during the edit, but that turns a fifteen-minute sort into a two-hour project and the momentum dies.
Zone Your Desk Surface
The Five Desk Zones
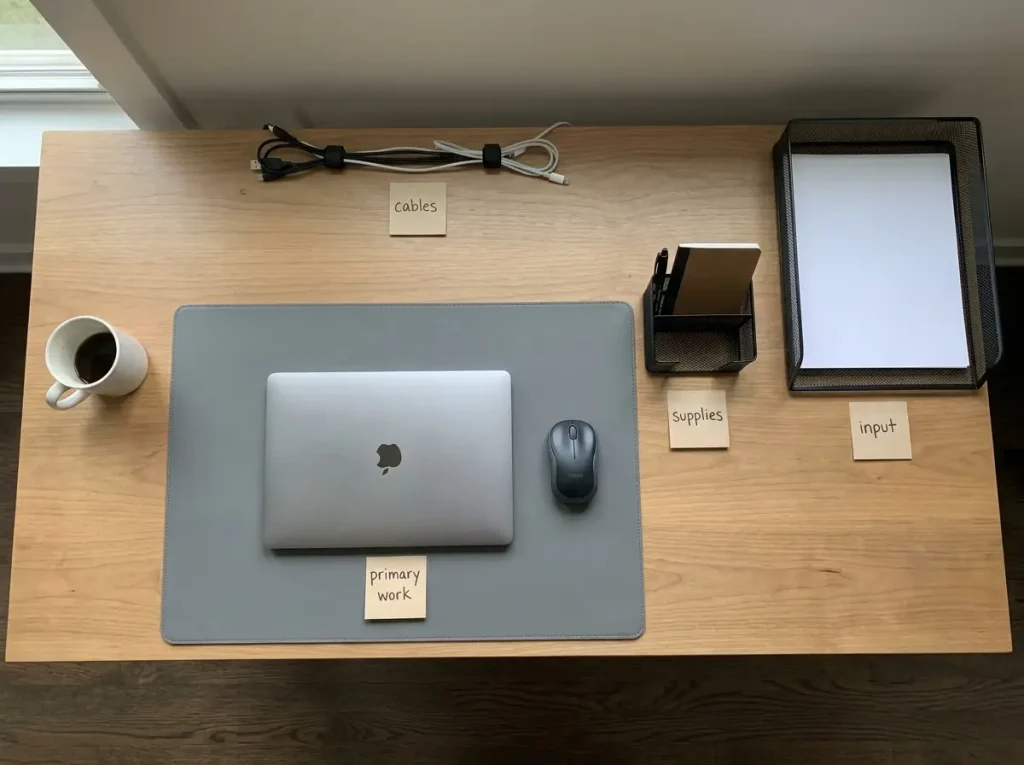
A desk that stays organized has five defined zones, each with a clear boundary and a rule. The desk surface zones are: primary work (center — laptop or monitor and keyboard only), supplies (right side if right-handed — one small organizer), input (one tray for incoming paper), reference (if needed — one binder or folder holder), and cables (back edge — out of sight).
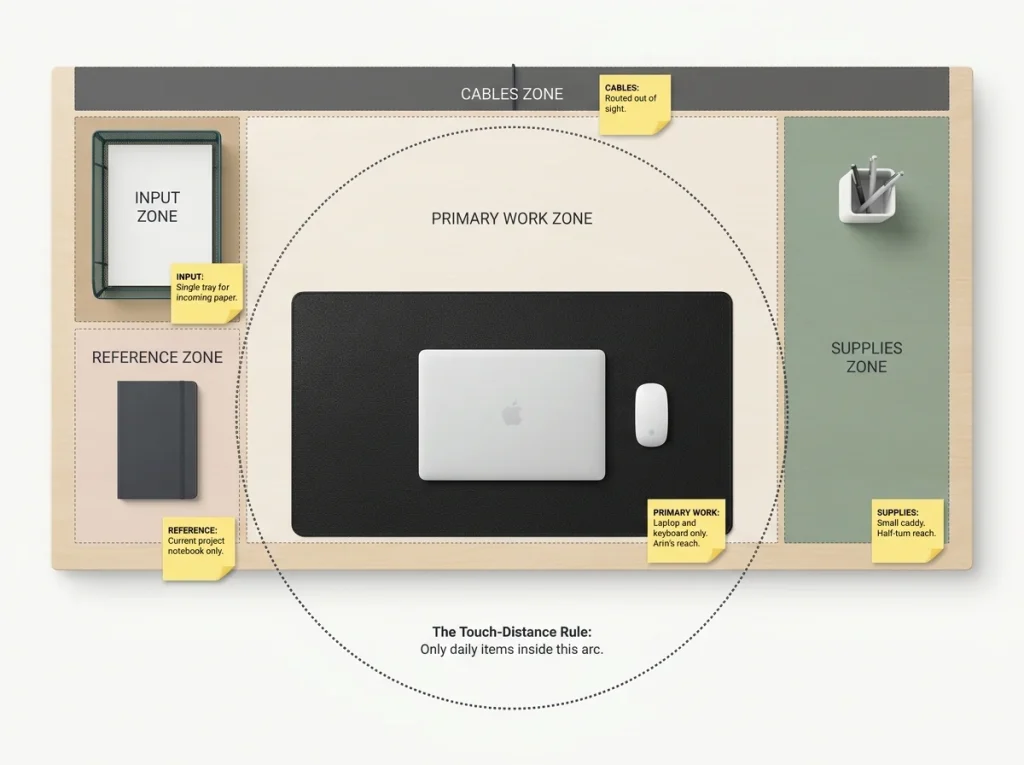
You don’t need to buy zone markers. A desk pad anchors the primary work zone visually and physically — anything outside the pad is not “work,” it’s support. A simple cork board from the dollar store works as a zone anchor if you want the cheapest option. If you also want surface protection, the Aothia PU Leather Desk Pad (31.5″ x 15.7″) covers the primary zone on a standard 48-inch desk and fits desks as small as 36 inches wide. The non-slip cork backing keeps it from sliding — which is the real test, because a desk pad that migrates across the surface defeats the entire purpose. The 31.5-inch width won’t cover a full 60-inch executive desk, but that’s actually the point: you want the edges of your desk to stay as distinct support zones.
The Touch-Distance Rule
Everything in the primary zone should be within arm’s reach without leaning. Everything in the supply zone should be reachable with a half-turn. If you have to stand up to grab something, it belongs in a drawer or on a shelf — not on the desk surface. This distance test determines what earns surface real estate and what gets relocated.
Pro tip: Sit at your desk and extend your arm in a half-circle. Everything your fingertips touch is the primary zone. Everything your full arm stretch reaches is the supply zone. Beyond that is storage territory — no matter how often you think you use it.
Sizing Zones to Your Desk
A 48-inch desk has room for all five zones with breathing space between them. A 36-inch desk might only fit three — primary work, one supply zone, and cables along the back edge. That’s fine. Smaller desks need fewer items on the surface, which means heavier reliance on drawers and off-desk storage. Don’t force five zones onto a desk that can only hold three — you’ll just recreate the clutter you’re trying to fix, this time with labeled clutter.
Desk Drawer Organization by Frequency
Standard Desk Drawer Depths (and Why This Changes Everything)
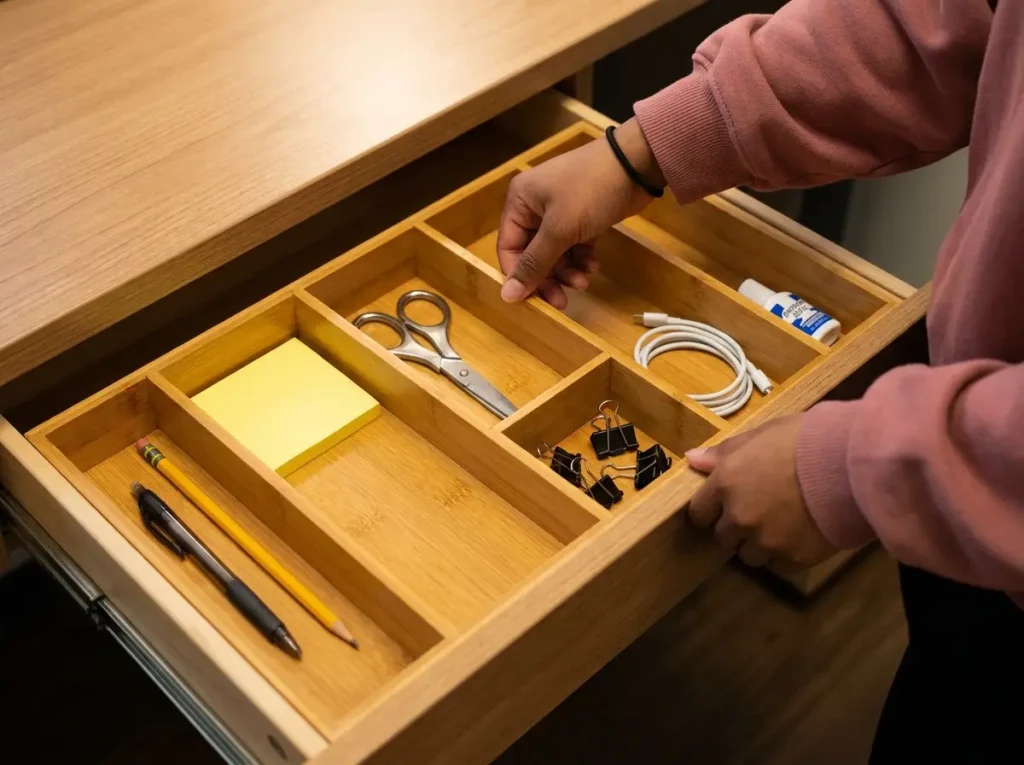
Most desk drawers are about 2 inches deep. That’s the standard shallow center drawer on an office desk or a typical IKEA desk. The organizers designed for kitchen drawers are typically 3-4 inches tall — too tall for a desk drawer. This is why the kitchen organizer you tried last time didn’t fit, why you shoved it in at an angle, and why you gave up on drawer organization entirely. Measure your drawer depth before buying anything.
The Frequency Zone for Drawers
Organize drawers the same way you zoned the surface — by frequency of use, not by category. The top center drawer holds daily-use items: one pen, one pencil, sticky notes, your phone charger cable. The side drawer holds weekly items: extra supplies, stamps, envelopes, a spare charging cable. Anything you use less than weekly goes in a file cabinet, a closet, or a box under the desk — not in a desk drawer.
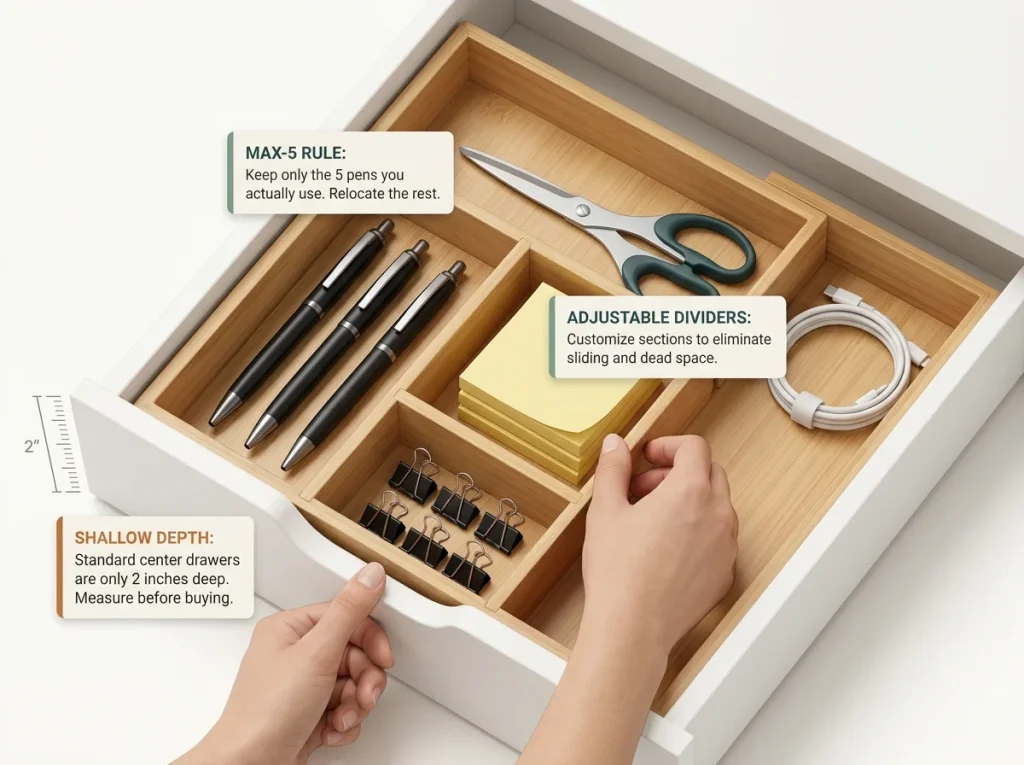
Old ice cube trays or small cardboard boxes from cereal packaging work as free drawer dividers in shallow drawers. If you want adjustable sections that actually fit a 2-inch desk drawer, the Marbrasse Bamboo Expandable Drawer Organizer has 10 compartments with movable bamboo dividers — it adjusts to fit different drawer widths and sits low enough for standard shallow drawers. One thing to measure first: the bamboo won’t work in drawers shallower than about 1.5 inches, so check yours before ordering.
The Max-5 Rule for Desk Supplies
Here’s the rule that prevents drawer clutter from coming back: no category gets more than five items. Five pens maximum. Five sticky note pads maximum. Five binder clips maximum. If you have twelve pens in your drawer, pick the five you actually write with and put the rest in a supply closet or donate them. Every extra pen is one more thing pushing your drawer toward the junk-pile state you just fixed.
Pro tip: Count your pens right now. If you have more than five, you’ll never reach for most of them. Keep the ones that work, relocate the rest. This applies to every supply category — scissors, tape dispensers, highlighters. Five is the ceiling.
Desktop Organizer — What to Keep Out and What to Skip
The 10-Item Rule for Desktop Supplies
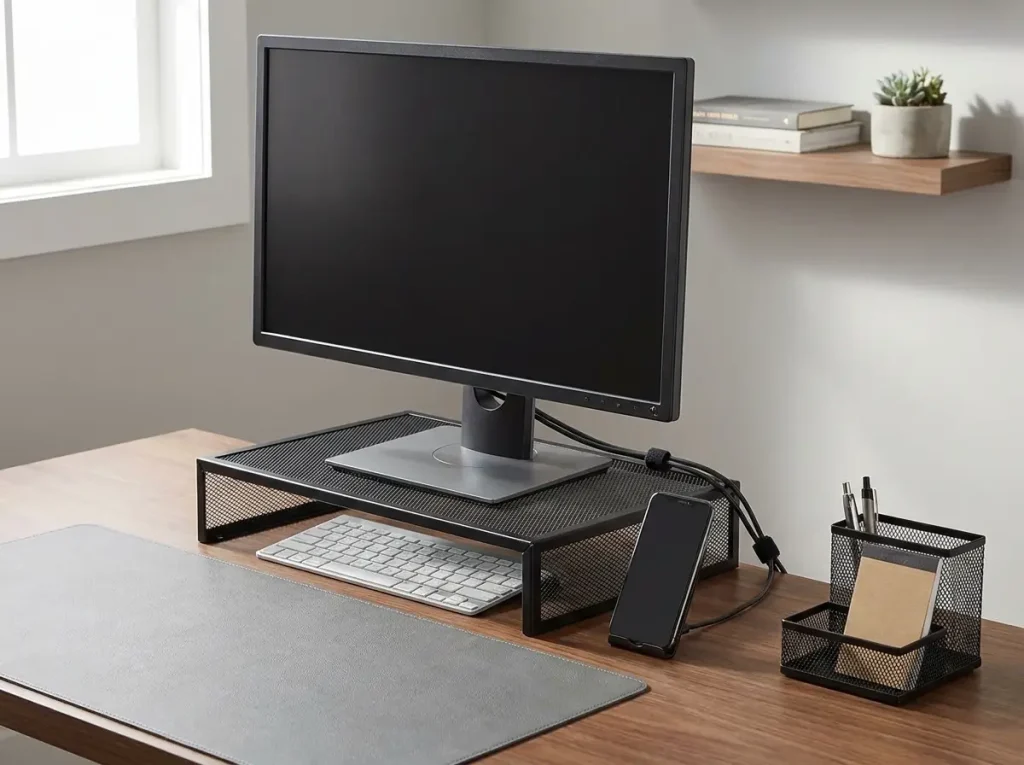
Count every individual item on your desk surface right now. Your monitor counts as one. Your keyboard counts as one. Your mouse counts as one. If the total exceeds ten, your desk will look and feel cluttered regardless of how well it’s organized. The 10-item rule is the single strongest predictor of whether a desk stays organized — because it limits what can accumulate before the system breaks down.
A repurposed mason jar for pens and a small shallow box for paper sorting work fine before buying any caddy. If you handle multiple types of supplies daily — pens, notebooks, scissors, sticky notes — the SimpleHouseware Mesh Desk Organizer with Sliding Drawer consolidates a drawer, a double paper tray, and five upright sections into one compact footprint. The metal mesh holds up in sunny spots near windows where plastic organizers warp and crack within a year. One limitation: the sliding drawer is shallow, so it handles sticky notes and paper clips but not bulkier items like tape dispensers or staple boxes.
Choosing the Right Organizer for Your Work Style
Not everyone needs a desk caddy. If you work entirely on a laptop and rarely use physical supplies, you need zero organizers on the surface. The goal isn’t to fill your desk with organizing products — it’s to match the organizer to what you actually use daily. A writer who uses one pen and one notebook needs a cup and nothing else. A crafter who uses twelve supplies daily needs a larger caddy. Match the tool to the work, not the work to the tool.
Monitor Riser or Monitor Arm?
If your monitor sits directly on the desk, your screen is probably 3-5 inches too low. You end up tilting your head down all day, which is why your neck hurts by 4 PM. The Cornell University Ergonomics guidelines recommend the top of your screen sits at or slightly below eye level — and most desktop monitors need a boost to get there.
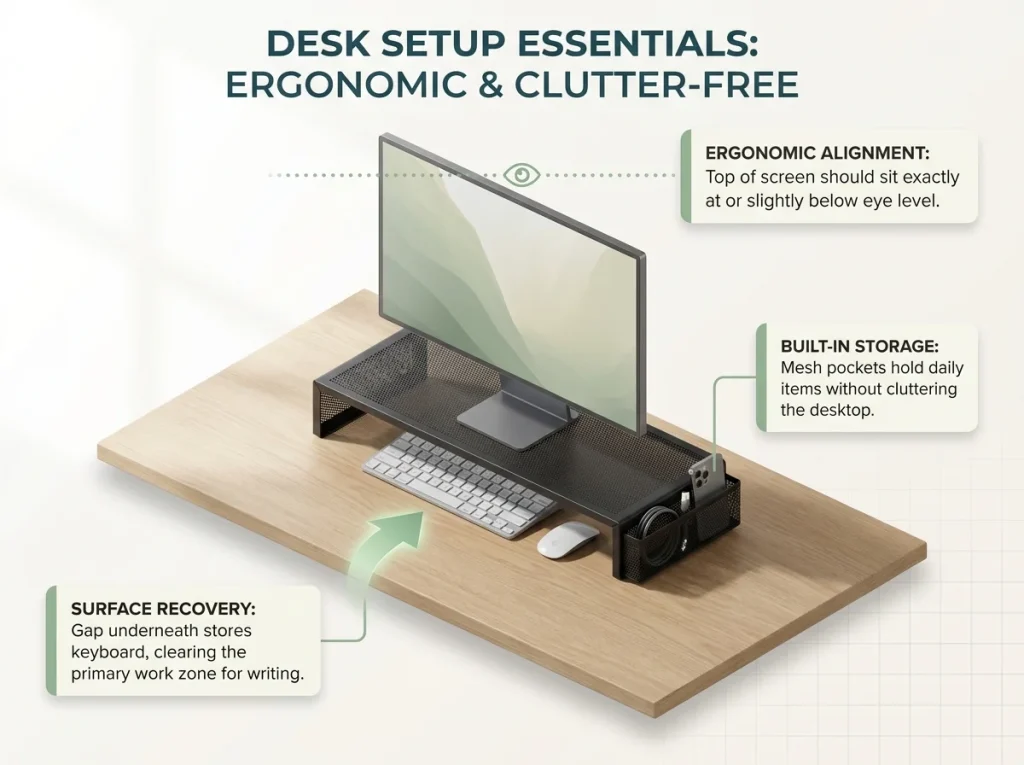
A stack of hardcover books raises a monitor temporarily while you figure out the right height before committing to a purchase. Once you know the lift works for you, a dedicated monitor riser adds usable storage underneath.
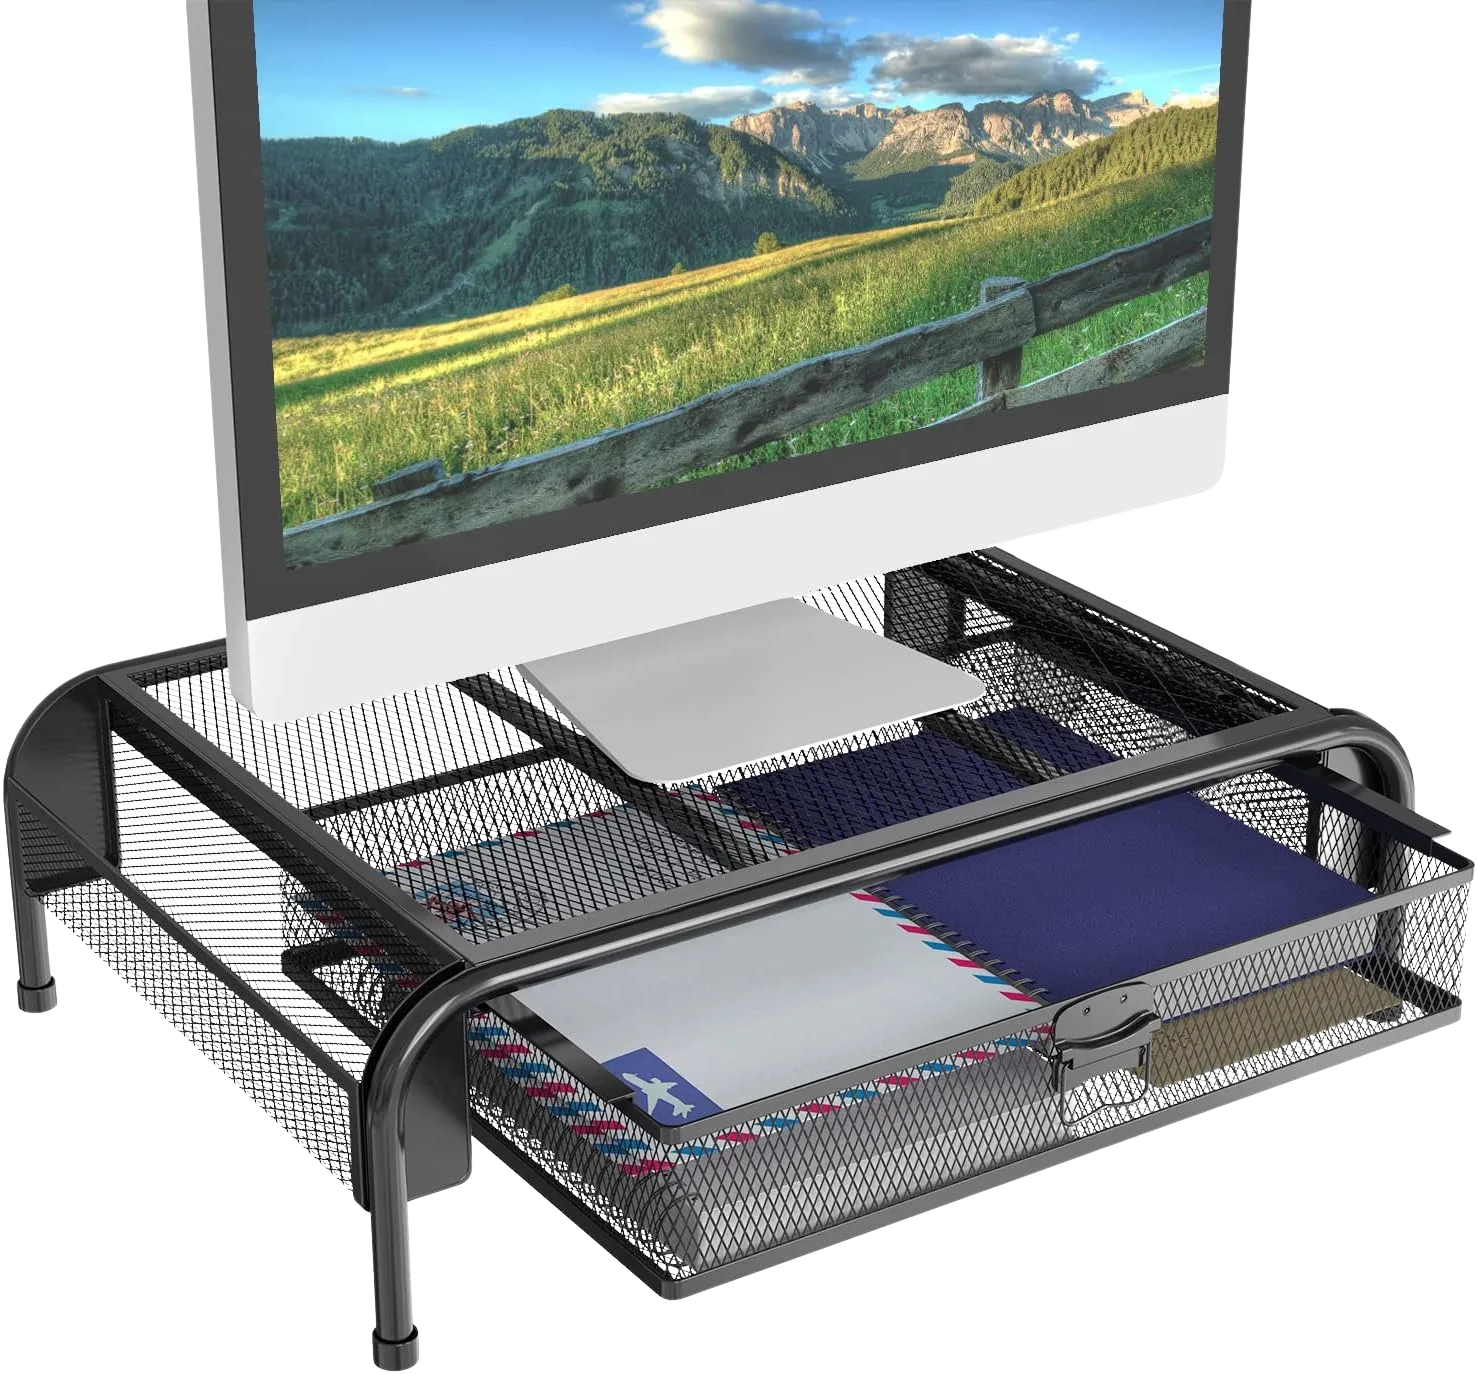
Monitor arms are the other option, but they require clamping to the desk edge or drilling into the desk surface. If you’re renting your furniture or your desk edge is thicker than 3.5 inches, a freestanding riser is the safer and more portable choice.
Cable and Cord Management — The Invisible Clutter
Routing Cables Before Organizing the Surface
Here’s the mistake most people make: they organize the desk surface first and deal with cables last. Cables should go first. Every cable draped across your desk surface is visual noise that makes the whole setup feel cluttered, even when everything else is neatly in its zone. Route cables before you place a single item on the surface.
Start by unplugging everything. Count how many cables you actually need running to your desk. Most setups require four: power, monitor, one USB-C hub, and a phone charger. If you have more than four cables visible on your desk surface, look at what can go wireless or get consolidated through a hub.
The Under-Desk Tray
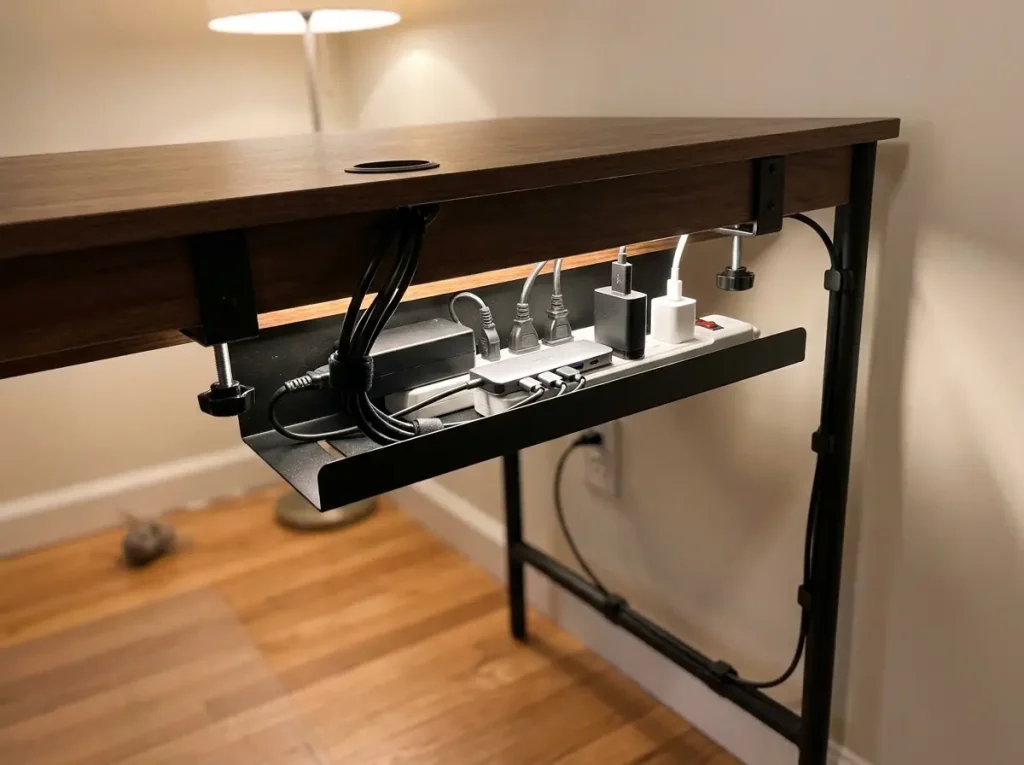
The goal is to get every cable off the surface and out of sight. The power strip and all its cable excess go under the desk in a cable management tray — mounted to the desk underside, not the wall.
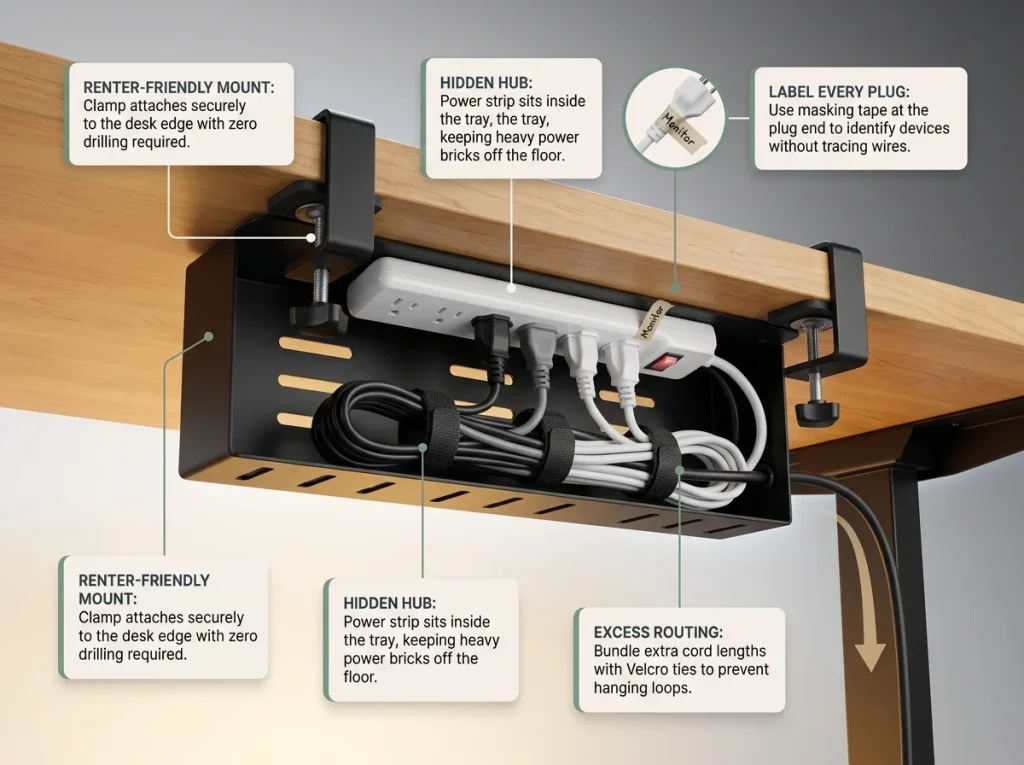
Adhesive cable clips along the desk legs route individual cables for a nearly free solution if a full tray is more than you need. For the complete fix, the Cinati 16″ Cable Management Tray (2-Pack) clamps to the desk edge with no drilling and no wall damage — fully renter-safe. The clamps fit desks 0.4 to 3 inches thick, which covers everything from IKEA desktops to solid wood tables. Each 16-inch tray holds a power strip plus two or three adapters. One thing to check: if your desk already has a center keyboard tray, make sure the clamp position doesn’t conflict with the tray rails.
Cable Labeling and the Wireless Option
Once cables are routed, label the plug end of each one at the outlet or power strip. The next time you need to unplug your monitor cable, you won’t have to trace it from the screen to the wall — just read the label. This is the same principle behind labeling pantry containers — the label does the remembering so you don’t have to.
Masking tape and a marker on each plug works as a free cable labeling system. If you’re also labeling desk trays, file folders, and paper bins, the Brother P-Touch PTD220 Label Maker handles both cable labels and paper system labels with laminated TZe tape that holds up in the warm spot behind the desk where adhesive labels tend to curl and peel. The trade-off: TZe tape cartridges cost more per roll than a roll of masking tape, so it only makes sense if you’re labeling more than just cables.
Pro tip: Label cables at the plug end, not the device end. You can always see which cable goes into your laptop — the mystery is always at the power strip where six identical black plugs sit side by side.
Paper and the One-Touch Rule
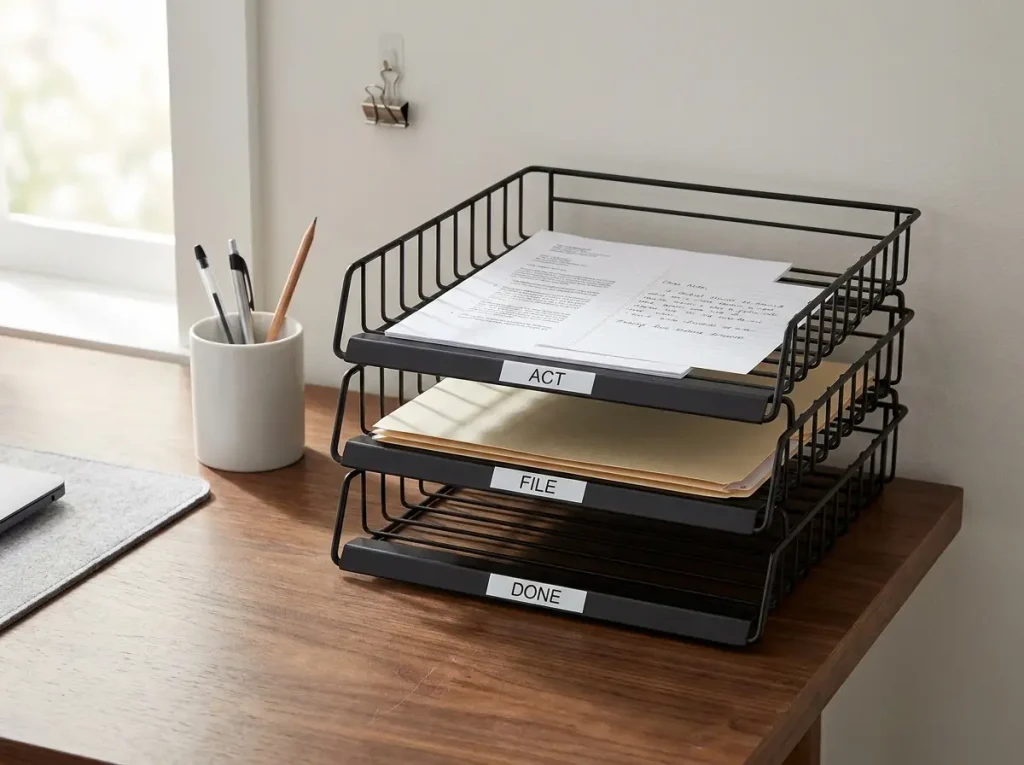
Why Paper Wins Every Time
Paper beats your desk because it’s deceptively passive. A single sheet takes up almost no space. Forty sheets take up half your desk. Paper accumulates because every piece requires a decision, and most people defer the decision by setting it down “for now.” That’s how a clean desk grows a paper reef in under a week — one deferred decision at a time.
The Three-Tray Desk System
The one-touch rule means every piece of paper gets handled once: pick it up, decide, and put it in one of three trays. Act (needs a response or action within 48 hours), file (keep but no action needed — goes into a folder during your weekly audit), and done (completed actions ready for filing or recycling). Three trays, three decisions, zero piles growing on your desk surface.
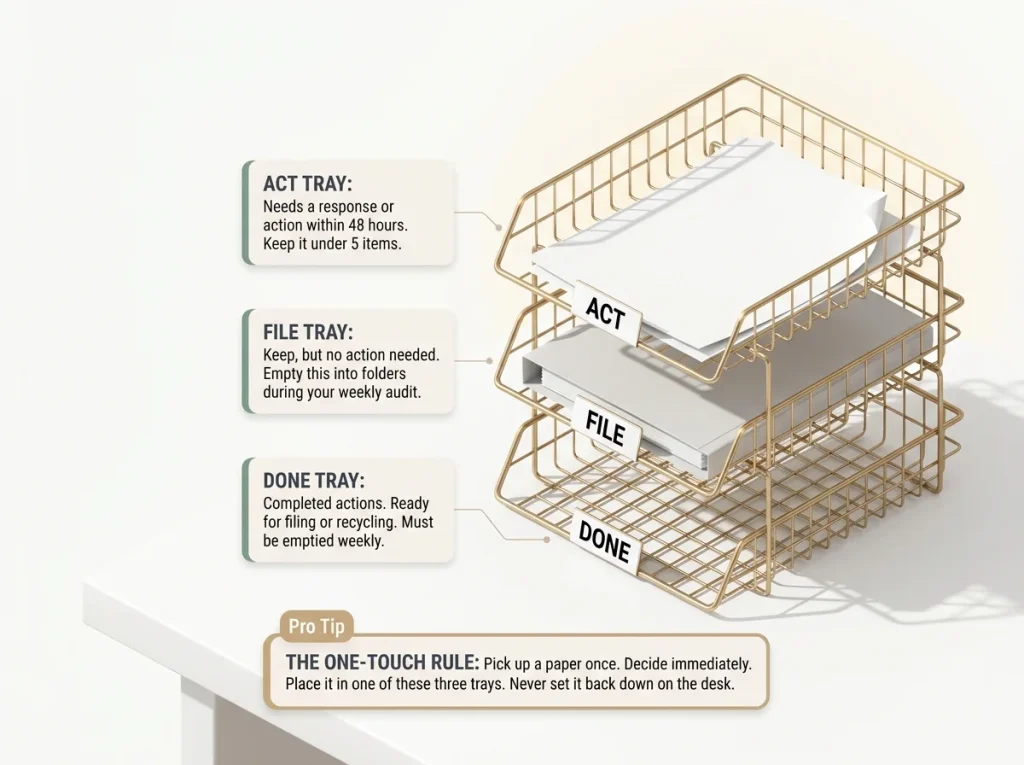
The trays sit in the input zone — back corner, non-dominant side. A basic set of wire letter trays costs less than a coffee. The trick isn’t the trays. It’s the rule. If your “Act” tray holds more than five items at any point, you’re deferring decisions, not making them. Process it down to two or three items and keep it there.
Reducing Paper at the Source
The best paper management system is less paper. Switch every bill and statement to paperless delivery. Photograph receipts with your phone and recycle the originals. Unsubscribe from catalogs you haven’t opened in three months. Every piece of paper you prevent from entering your desk is one less decision you have to make. The goal isn’t a better paper filing system — it’s fewer papers to file in the first place.
The 5-Minute Reset That Makes the System Last

What the Daily Reset Covers
This is the step that separates a desk that stays organized from one that reverts in a week. Every evening — or every morning if you prefer a fresh start — spend five minutes on four things: return every item to its assigned zone, process at least one paper from the Act tray, close all open drawers, and push your chair in. That’s the entire daily desk reset.
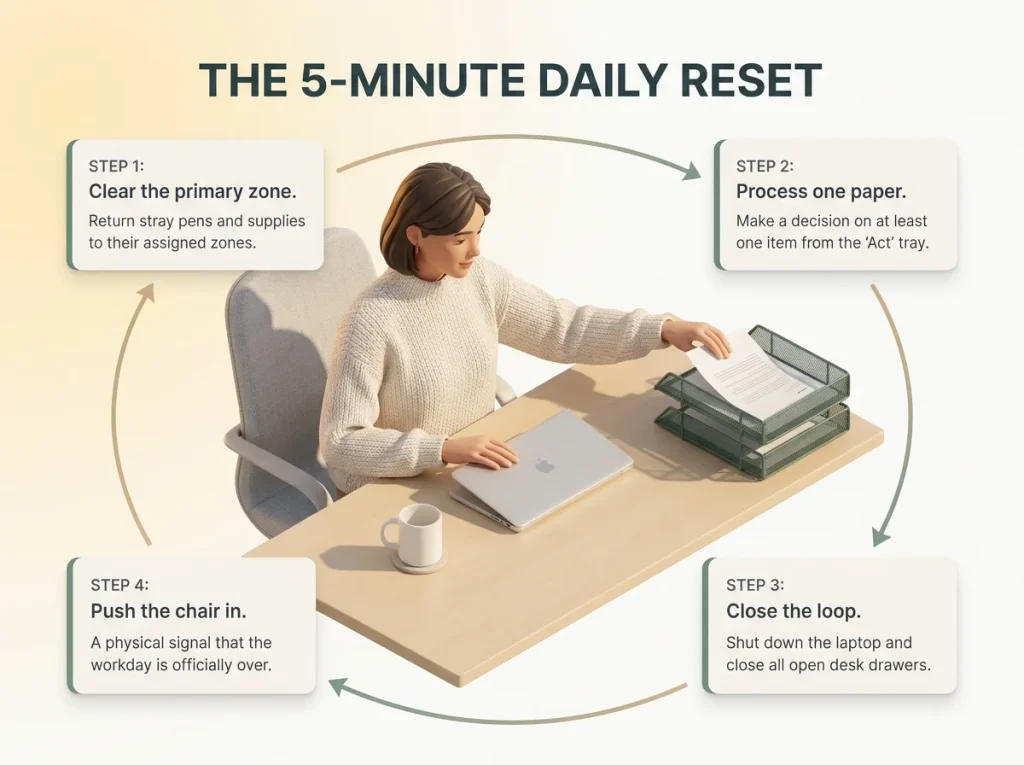
The reset works because it prevents compounding. One pen left out is nothing. Seven days of one pen left out, plus a cable, plus three sticky notes, plus yesterday’s mail is the beginning of a full revert. The daily reset catches drift before it becomes clutter. This is the same maintenance principle behind a no-drill closet organization system for renters — the organizing products only work long-term if there’s a regular maintenance habit holding the system together.
The Weekly Desk Audit
Once a week — pick the same day every week — do a deeper pass. File everything in the “file” tray into its proper folder. Empty the “done” tray completely. Check your drawer supplies against the max-5 rule. Wipe down the desk surface. This takes ten minutes and keeps the small daily drift from snowballing into a total reorganization project.
Pro tip: Pair your weekly desk audit with another weekly habit you already do — trash day, laundry day, whatever you do on a fixed schedule. Stacking habits on existing routines is how they actually stick. If it’s a standalone task, it gets skipped by week three.
The Three-Month Re-Calibration
After three months of using this system, your actual usage patterns will reveal themselves. You’ll notice the “supplies” zone migrated to the left because you’re left-handed and the original right-side placement never felt natural. You’ll realize you never open the second drawer, so it’s effectively dead storage holding things you forgot about. You’ll find three items in your daily-use drawer that you haven’t touched once.
That’s normal and expected. The three-month mark is your scheduled re-calibration. Adjust zones to match your real behavior. Swap what’s in the daily drawer based on what you’re actually reaching for. Move the paper trays if they ended up in a spot that makes you avoid them. The system isn’t rigid — it adapts to how you actually work, not how you planned to work on the first Saturday.
Conclusion
Three things keep a desk organized past the first week:
- Zone the surface — boundaries prevent surface creep from undoing your work overnight
- Edit before buying — most desks hold twice what they need, and no organizer fixes an excess problem
- Reset daily — five minutes each evening is the difference between a system that lasts three months and one that lasted three days
Three-Month Check: Revisit your zones and drawer contents at the ninety-day mark. Your real usage patterns will look different from your original plan — adjust the layout to match how you actually work, not how you thought you’d work.
Start with one thing: the edit. Pull everything off the desk, sort it into three piles, and put back only what you use daily. You can add zones, organizers, and the reset routine later. Get the surface clean first — everything builds from there.
Q1 How do I organize a desk with no drawers?
Use the surface zone system with a single desk caddy for daily supplies and a small filing box on the floor beside the desk. Without drawers, strict surface limits matter even more — keep your total visible items under eight to prevent the surface from becoming de facto storage.
Q2 How often should I reorganize my desk?
A five-minute daily reset keeps the system running without effort. Do a deeper ten-minute audit weekly to process paper trays and check supply counts. Full re-calibration every three months adjusts zones and drawer contents to match your actual usage.
Q3 What is the best desk organizer for a small desk?
A single compact caddy that combines pen storage, a small tray, and one drawer beats multiple separate organizers on desks under 40 inches wide. Fewer pieces on the surface means more usable work area — which matters more on a small desk than extra storage capacity.
Q4 How do I keep cables organized on my desk?
Route all cables under the desk first using a clamp-mount cable management tray — no drilling needed. Label each plug at the power strip end so you can identify cables without tracing them. Reduce total cable count by switching to wireless peripherals wherever practical.
Q5 Should I use a desk pad for organization?
A desk pad anchors your primary work zone and creates a visual boundary that prevents surface creep into that area. Choose one that covers about two-thirds of your desk width — a pad that covers the entire surface eliminates the zone contrast that keeps boundaries visible and functional.