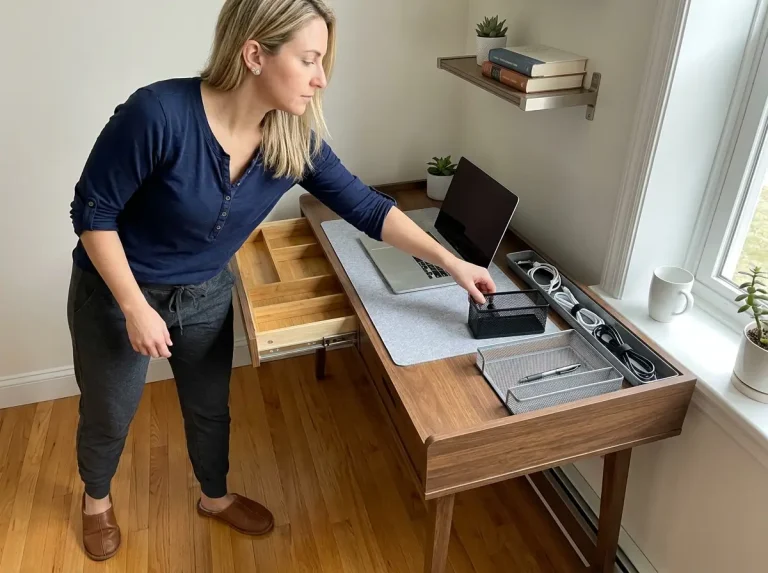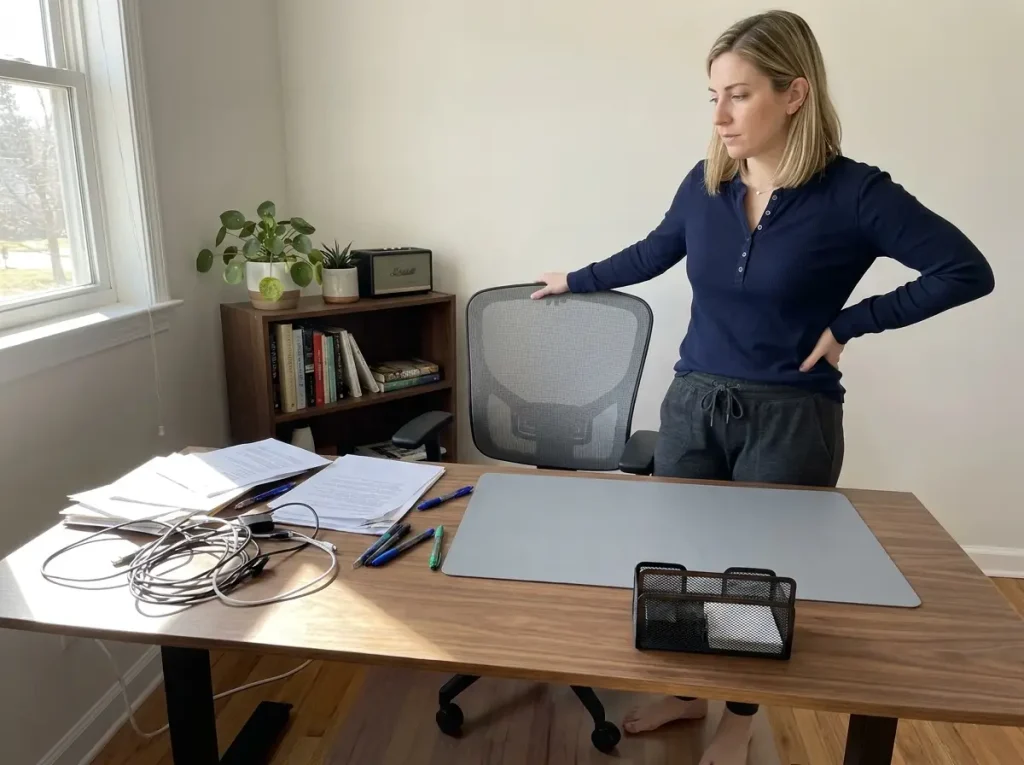
You’ve organized your desk before. Probably more than once this year. You sorted the pens into a cup, stacked the papers, pushed the cables behind the monitor, and took a mental snapshot of how clean everything looked. Two weeks later, the surface was covered again — and you assumed the problem was discipline.
It wasn’t. The problem with most desk organization ideas is that they focus on how the desk looks when you finish and skip the system that keeps things in place once you’re actually working. After resetting dozens of home office desks — including my own, multiple times — the pattern is consistent: surface clutter returns when items don’t have fixed homes, zones don’t have boundaries, and nobody builds in the daily reset. These 11 ideas target the structure underneath the organized desk, not the photo of it.
Quick Answer: The desk organization ideas that hold up long-term address the system, not just the surface:
- Zone your desk into primary, secondary, and tertiary areas before buying any organizer
- Use vertical storage like monitor risers to reclaim surface space without drilling
- Measure your drawers before buying dividers — most expandable organizers need specific width ranges
- Route cables under the desk first, then organize the top
- Build a five-minute daily reset into your routine so the layout survives past two weeks
Why Your Desk Organization Ideas Stop Working After Two Weeks
The “No Home” Problem
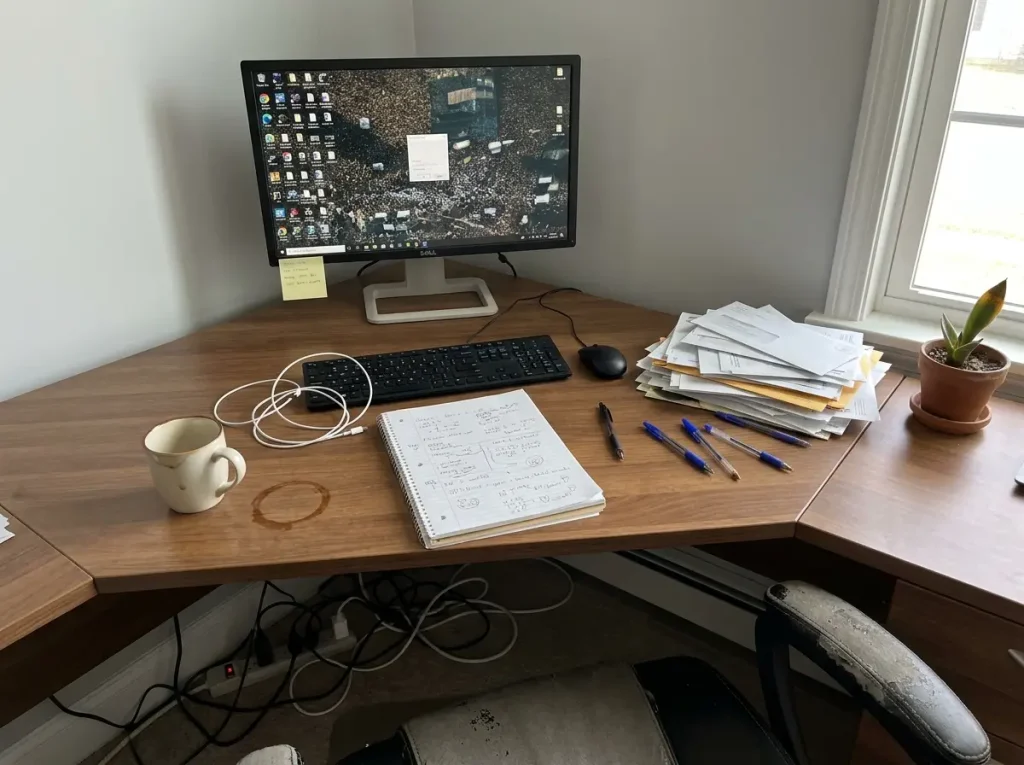
Every item on your desk needs a permanent address — not a general area, a specific spot it returns to at the end of every work session. When you reorganize without assigning fixed locations, items drift. The first sign is always the pen. One pen comes out of the cup and stays on the desk pad. Then two. By Friday, the cup is decorative and the pens live wherever you set them down last.
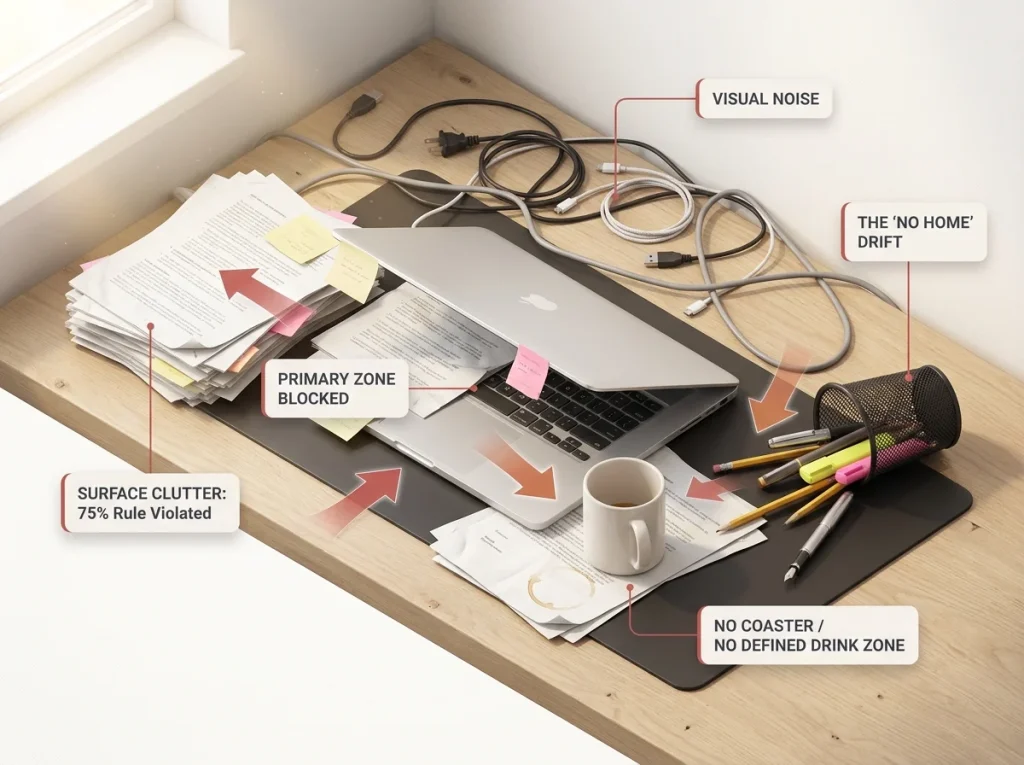
This drift happens because the “home” was never specific enough. “The right side of the desk” is not a home. “The second section of the mesh organizer, left of the sticky notes” is. The more precise the location, the more likely you are to return things there without thinking about it. If you’ve tried organizing your desk before and watched it revert within a month, building that full desk organization system with defined zones and a daily reset is what makes the difference.
The After-Photo Trap
Most desk organization content shows you the finished result and assumes the system runs itself. It won’t. That clean desk photo is a snapshot of minute one — it tells you nothing about what happens on Tuesday at 3 PM when you’re on a call, scribbling notes, and setting your coffee down on top of a document because there’s no clear zone for the mug.
Organization is a daily practice, not a weekend project. The desk that looks perfect on Sunday unravels by Wednesday because nobody built the five-minute reset into the routine. If you skip the maintenance step, you’re just rearranging the same clutter on a recurring schedule.
What Makes a Desk System Last
Three things separate a desk that stays organized from one that reverts: every item has a specific home, zones have visible or functional boundaries, and there’s a daily reset that takes under five minutes. The reset is the part most people skip. It’s also the part that determines whether your desk stays clean past the second week.
The ideas below build on each other. Start with zones, then add storage and cable management. Skip the zone step and the organizers become new surfaces to pile things on.
Zone Your Desk First (Before You Buy Anything)

Idea 1: The Primary Zone and the 18-Inch Rule
Your primary work zone is the 18 inches directly in front of your chair. This is where your keyboard, mouse, and whatever you’re actively working on right now live. Nothing else belongs here — not your phone, not a snack, not a stack of reference papers.
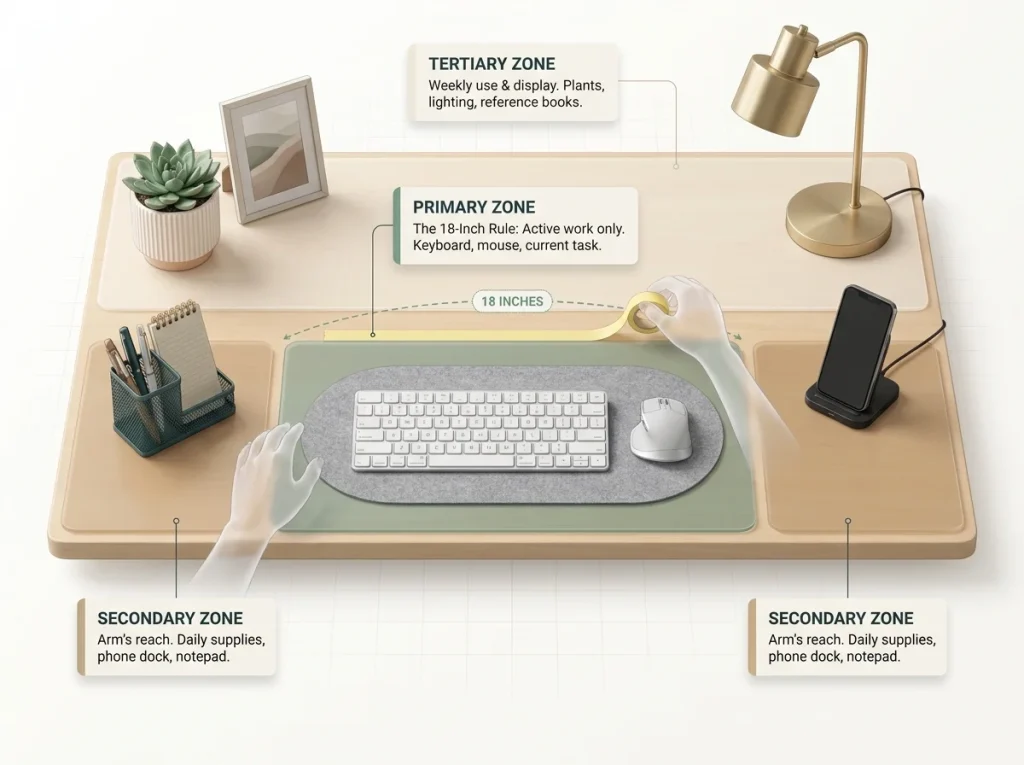
The 18-inch measurement isn’t random. It matches the comfortable reach distance when your elbows stay at your sides. Anything outside that range requires you to lean or twist, which means it breaks your flow every time you grab it. Once you establish this boundary — even mentally — you’ll notice right away when something violates it.
Pro tip: Use a strip of low-tack washi tape across the desk for the first week to mark your primary zone boundary. You’ll train yourself to keep the center clear. Remove the tape once the habit sticks.
Idea 2: Secondary and Tertiary Zones
The secondary zone covers the areas to the left and right of your primary workspace, within arm’s reach but outside the 18-inch center. This is where items you use several times daily go: a notepad, your phone dock, reference documents, or a desktop organizer holding the supplies you reach for regularly.
The SimpleHouseware Mesh Desk Organizer with Sliding Drawer works well in this zone because its five upright sections and sliding drawer keep pens, mail, and small supplies sorted without spreading across the desk surface. It measures about 11.5 inches wide by 9 inches deep, so it fits on either flank without crowding the primary zone. One thing to watch: the upright sections are open-topped, so very short items like binder clips and paperclips will get lost in the bottom — those belong in the drawer. If you don’t want to spend anything, a repurposed mason jar holds pens upright and a small kitchen tray corrals mail at zero cost.
Your tertiary zone is the far edges, corners, and areas behind the monitor. Plants, framed photos, a speaker — things you look at or use weekly at most. If something in the tertiary zone keeps migrating toward your primary zone, it either belongs in the secondary zone or it doesn’t belong on the desk at all.
Idea 3: The First Edit
Before placing a single organizer, take everything off the desk and out of the top drawer. Sort into three categories: use daily (stays on or near the desk), use weekly (goes in a drawer or shelf), and hasn’t been touched in a month (remove from the workspace entirely). Most people discover that 40-60% of their desk contents fail the “daily use” test.
The edit is the step that makes every other idea in this article work. Skip it and you’re organizing clutter instead of removing it. You’ll end up with a neat arrangement of things you don’t need — which is still a collection of things you don’t need.
Vertical Storage Solutions That Work Without Drilling
Idea 4: The Monitor Stand Double-Play
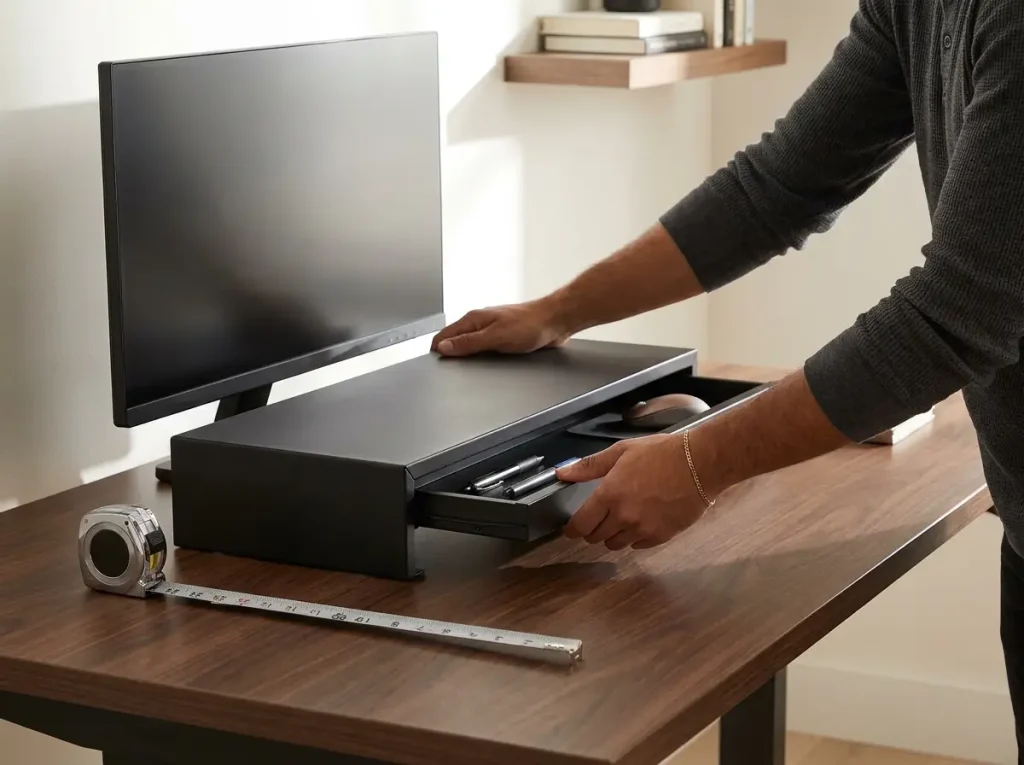
A monitor riser solves two problems with one piece of furniture: it raises your screen closer to eye level, and it creates a shelf underneath for items that would otherwise scatter across the desk surface. That under-monitor space fits a wireless mouse, cables, a phone, or small supplies — all hidden from view but within reach.
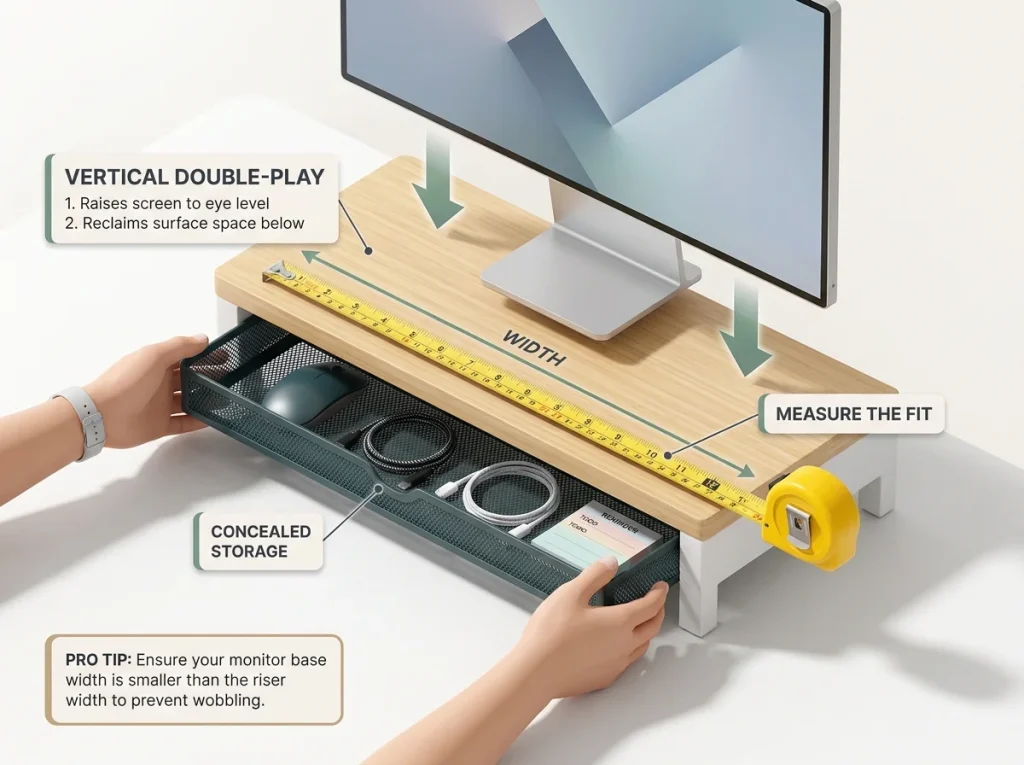
The Halter Monitor Stand Riser with Storage Drawer measures roughly 22 inches wide by 9 inches deep by 4 inches tall, with a pull-out drawer underneath. It sits on the desk surface with no installation — you place it down, set your monitor on top, and the space underneath becomes usable storage. The two-pack version is solid value if you run dual monitors or want a second riser as a side shelf. If you only need one, the single-unit version (same design, same drawer) runs roughly half the cost and makes more sense for a single-monitor setup. One limitation: if your monitor has an extra-wide base, measure it against the stand’s 22-inch width before ordering — a base that overhangs the riser edges will wobble.
Pro tip: Before buying a monitor stand, stack two hardcover books under your monitor for a week. If the height feels right, a 4-inch riser is your match. If you need more lift, look for a 5-6 inch model instead.
Idea 5: Pegboard and Wall Shelves — When to Skip Them
Pegboard walls and floating shelves look fantastic in home office photos. In a rental, they mean holes you’ll need to patch when you move out. In any space, they only work if you actually use what’s hanging — a pegboard covered in tools you reach for daily is useful; one covered in decorative items is a wall display, not organization.
The National Association of Productivity and Organizing Professionals recommends matching storage to usage frequency — wall-mounted solutions should hold items you reach for daily or near-daily. If you’re hanging items you use once a month, a drawer serves you better and keeps the wall clean.
Skip wall-mounted storage if you rent, if the wall behind your desk shares a bedroom (the vibration from hanging and removing items carries through drywall), or if you move more than once every two years. The installation-and-patching cycle eats time and deposit money that a desktop shelf would save entirely.
No-Drill Alternatives That Actually Hold
Command strips, adhesive-mount shelves, and clamp-on desk accessories fill the gap for renters. The detail most people learn the hard way: weight capacity. Adhesive-mount solutions typically max out at five to seven pounds. A small shelf of pens and a notepad is fine. A row of reference books will pull the mount off the wall within a month — usually around 2 AM, which you’ll hear from two rooms away.
For anything heavier than a small supply shelf, clamp-mount accessories are more reliable. They grip the desk edge without drilling and hold more weight because the force is distributed through the clamp mechanism rather than adhesive alone. If you’re renting and your desk sits against a wall you can’t touch, clamp-mount is the category to shop.
Desk Drawers and Desktop Surfaces That Hold Their Shape
Idea 6: Measure Your Drawer Before You Buy Anything
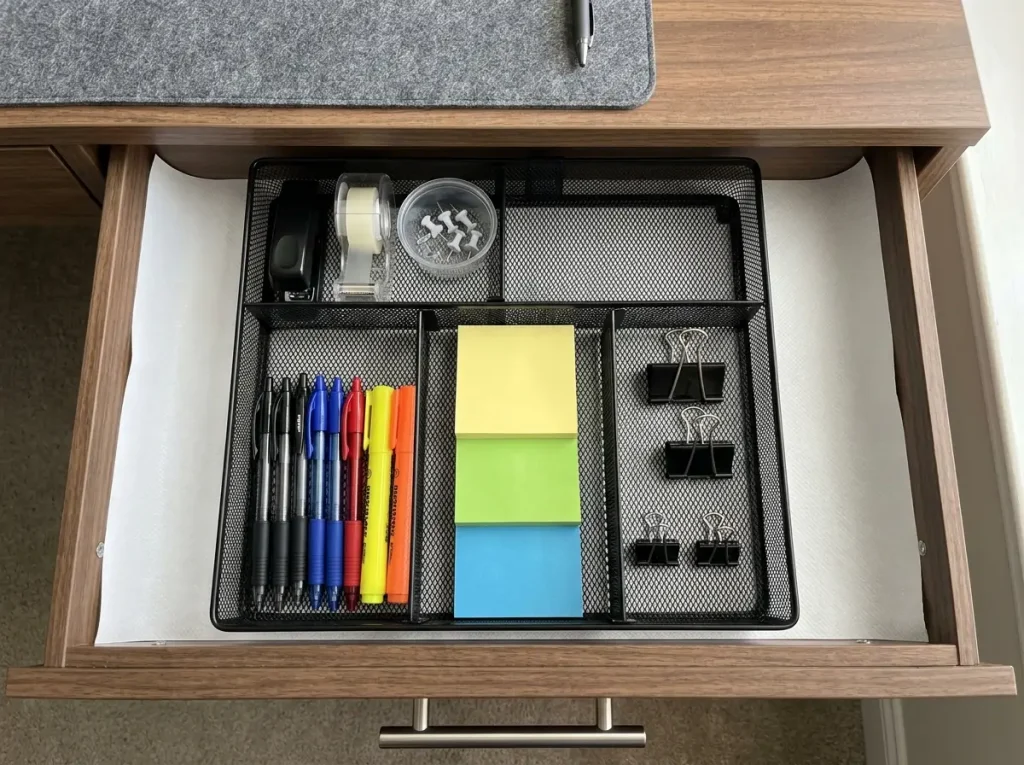
The most common mistake with desk drawer organizers is buying one without measuring the drawer first. Expandable organizers look universal on the product page, but every one has a minimum and maximum width. If your drawer falls outside that range, the organizer either won’t fit or rattles around loosely inside — and a loose organizer is worse than no organizer because everything shifts every time you open the drawer.
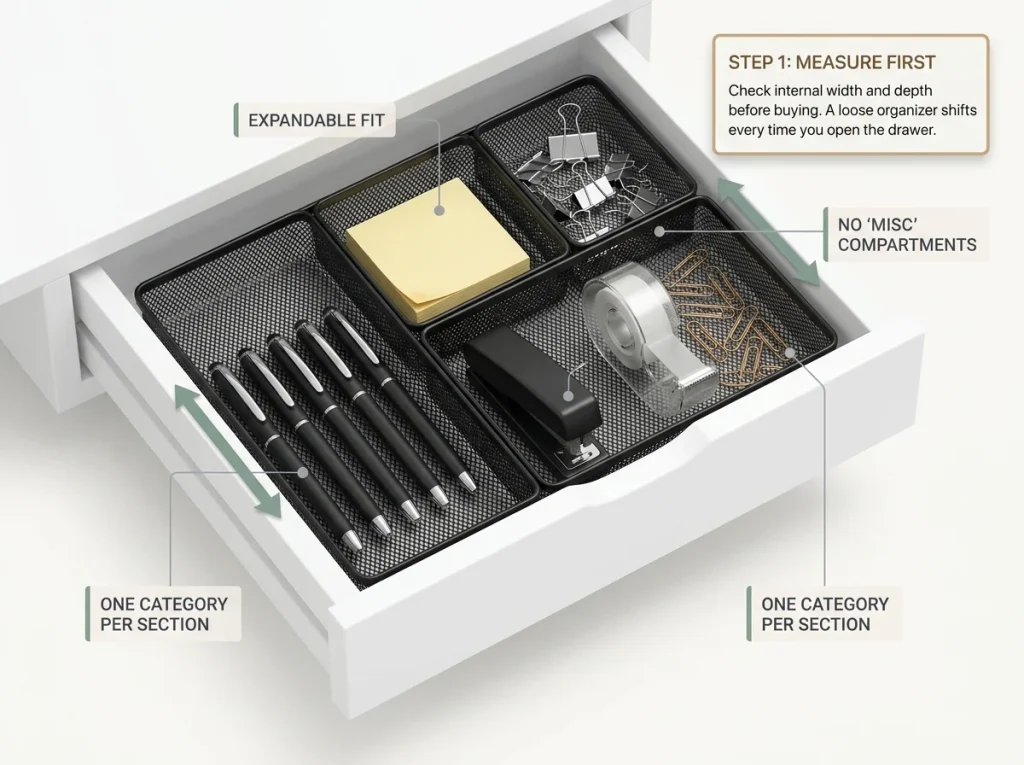
The Marbrasse Expandable Desk Drawer Organizer adjusts from about 13.8 inches to 17.5 inches wide, which fits most standard desk drawers in the 18-to-22-inch range. Measure the inside width and depth of your drawer before you shop — write the numbers down. This takes thirty seconds and saves the return-and-reorder cycle that wastes a week.
Ten adjustable compartments sounds like a lot until you realize that pens, binder clips, tape, sticky notes, and a small stapler each need their own section to stay sorted. A cheaper option with six or seven compartments works if you store fewer categories.
Idea 7: The One-Tray Rule for Desktop Surfaces
Limit your desktop organizer count to one. Two organizers on the desk surface means you’ve split your system, and items will migrate between them until neither one makes sense anymore. One tray or caddy forces a decision: what actually earns surface-level access? Everything else goes in the drawer or off the desk entirely.
This rule feels restrictive for the first few days. Then you notice that most of what you were keeping on the surface isn’t daily-use — it’s “might need it” stuff that belongs in a drawer. The one-tray constraint makes you confront that distinction instead of avoiding it.
Idea 8: The Paper 75% Rule
Paper is the number one source of desk surface clutter. Not cables, not pens, not random office supplies — paper. A single piece of mail turns into a geological formation on the corner of the desk within a week if there’s no decision rule for incoming paper.
The 75% rule works like this: when your inbox tray, paper sorter, or “to deal with” pile reaches 75% capacity, process it. Don’t wait for overflow. Sort every piece into act (needs a response this week), file (store away), or recycle. The moment you let paper break the 75% threshold, the pile becomes background furniture — your brain stops registering it, and it grows until it absorbs a third of the desk.
Pro tip: Set a recurring calendar reminder twice a week to process your paper tray. It takes four minutes. Skip it for two weeks and you’ll need forty minutes to dig back out.
Cable Management: The Fix Nobody Does Right
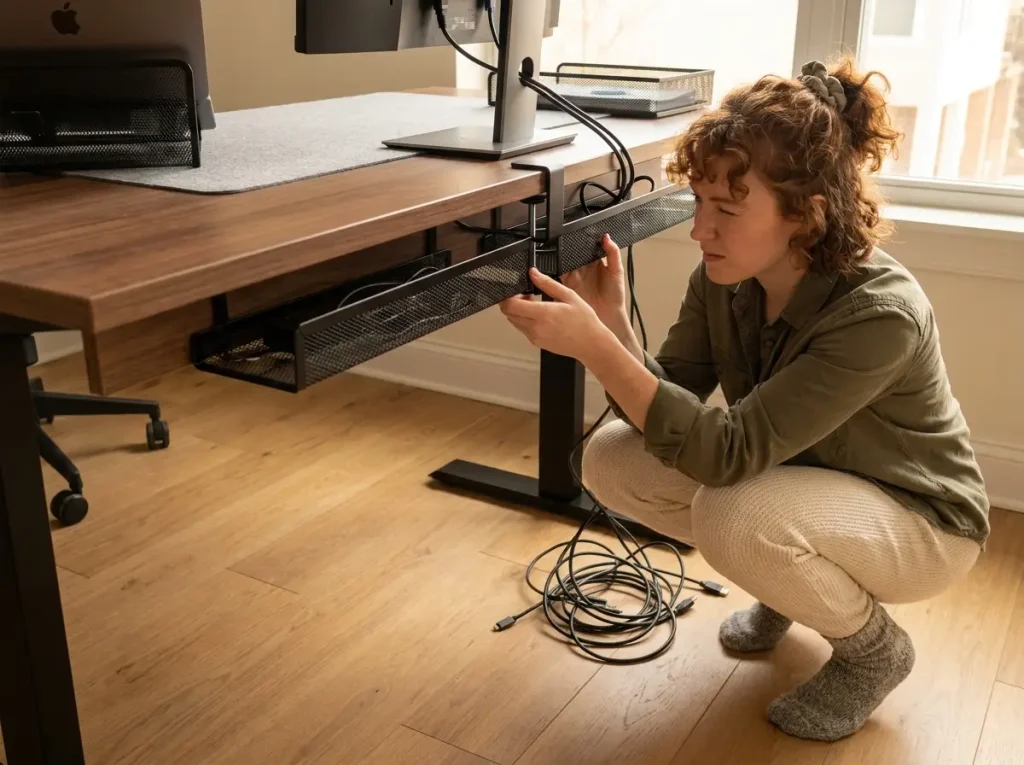
Idea 9: Under-Desk Cable Routing
Route every cable under the desk surface before you organize anything on top. If cables cross your work area — draped from the monitor to the floor, snaking across your desk pad to a charger — no amount of trays and bins will make the desk feel organized. The visual noise from exposed cables undermines everything else you’ve set up.
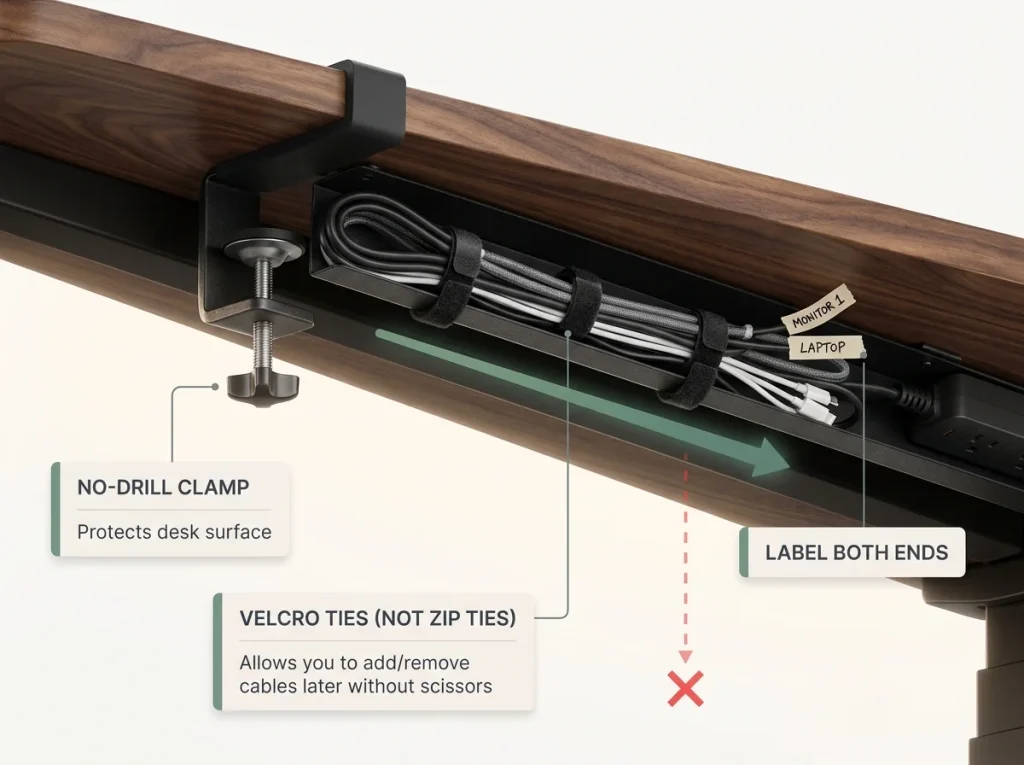
The No Drill Under Desk Cable Management Tray extends from 16 to 31 inches and clamps to the desk edge without drilling — the clamp fits desk surfaces up to 2 inches thick, which covers most standard desks and standing desk frames. You route every cable through the tray, and the entire mess moves from the desk surface and floor to a single hidden channel underneath. One limitation: if your desk edge is rounded or beveled, test the clamp fit before committing — some rounded profiles don’t give the clamp enough grip. For a simpler setup with only one or two cables, self-adhesive cable raceway clips are cheaper and get the job done, but they can’t handle more than two or three cables without looking cluttered themselves.
Idea 10: Label and Bundle
Use velcro cable ties, not zip ties, to bundle cables behind the desk. Zip ties are permanent — when you replace a monitor, add a device, or rearrange your desk layout, you’ll need scissors to cut through every bundle and re-tie them. Velcro ties release and reattach in seconds.
Label each cable at both ends with a small piece of masking tape and a pen. This takes three minutes during setup and saves twenty the next time you need to unplug one specific cable from behind the monitor. The feeling of reaching behind a desk and pulling out the correct cable on the first try — without tracing it from the device — is the kind of small win that makes the whole system feel worth maintaining.
Idea 11: The Charging Station Zone
Designate one spot in the tertiary zone as the charging station. All phone, tablet, earbud, and watch chargers go here. Nowhere else on the desk. When a device finishes charging, it moves to your secondary zone or your pocket — it doesn’t sit in the station taking up space.
A single multi-port USB charger replaces three or four separate wall adapters and cuts your cable count by two-thirds. The fewer adapters plugged into your power strip, the fewer cables competing for tray space underneath the desk — and the less visual noise reaching the floor.
Making These Ideas Stick
The desk organization ideas that survive past two weeks share three traits: every item has a fixed home with a specific location (not a general area), zones have boundaries that separate active work from storage from decoration, and a daily five-minute reset prevents the slow accumulation that turns a clean desk back into a cluttered one.
Three-Month Check: Revisit your zone layout every quarter — your daily-use items shift as projects change, and the primary zone that worked in May might need a different configuration by August.
Start with one zone. Clear the 18 inches in front of your chair, remove everything that isn’t active work, and live with just that change for a full week before adding organizers, buying storage, or tackling cables. The zone will teach you what actually belongs on the surface — and most of it is less than you think.
Q1 How do I organize my desk if I don’t have drawers?
Use a multi-section desktop organizer and a monitor riser with a pull-out drawer to create concealed storage directly on the desk surface. Clamp-on accessories and wall-mounted shelves add vertical storage if you need more room beyond what the desktop holds.
Q2 What’s the best way to keep a shared desk organized?
Assign each person one dedicated section of the desktop organizer or one exclusive drawer so personal items stay in separate fixed homes. Shared supplies go in a neutral secondary zone. The daily reset matters even more on shared desks because two people’s clutter compounds twice as fast.
Q3 How often should I fully reorganize my desk?
A full desk reorganization every three to four months keeps your zone layout current as your daily tasks and active projects shift. Between full resets, the daily five-minute reset prevents reversion. If your desk reverts within two weeks, adjust the zone structure — not another weekend overhaul.
Q4 Do desk organizers actually help or just add clutter?
Desk organizers reduce clutter only when every single section has an assigned category — an organizer with a miscellaneous section becomes entirely miscellaneous within a month. Buy one after you know what you need to store, not before, and limit desktop organizers to one.
Q5 How do I manage cables from a standing desk?
Standing desks need a cable management tray mounted to the desk surface — not the wall or legs — so cables travel with the desk during height changes. Use longer cables than a fixed desk requires, and secure excess length with velcro ties inside the tray so nothing dangles during adjustments.
Disclaimer: ClutterlessNest is a participant in the Amazon Services LLC Associates Program. As an Amazon Associate we earn from qualifying purchases. This article may contain affiliate links — if you buy through them, we may earn a small commission at no extra cost to you. We only recommend products we have tested or genuinely believe in.