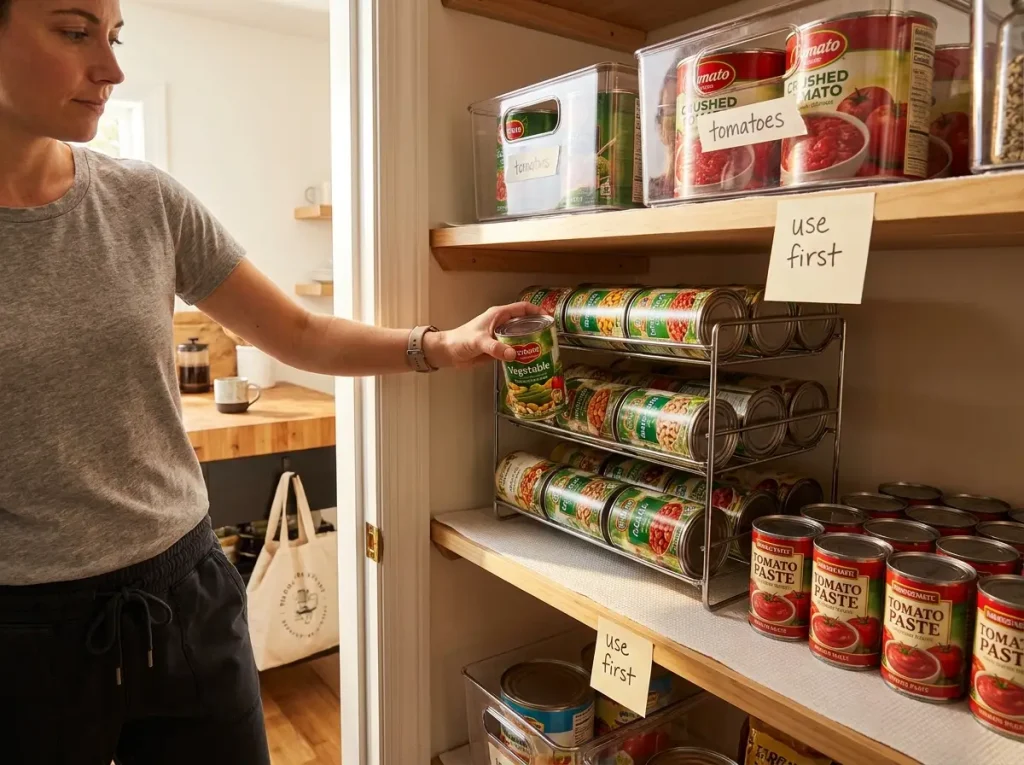
You open the pantry, reach for a can of diced tomatoes, and three cans of corn roll off the shelf behind it. Sound familiar? You buy another can of black beans because you can’t see the four already hiding behind the soup. Two months later you find a can of green beans that expired in 2023.
Cans are the hardest pantry item to keep in order because they roll, they’re heavy, and they all look the same from the top. I’ve reorganized enough pantries to know that most “organize your canned goods” advice skips the part that actually matters — matching your organizers to your actual can sizes and building a rotation system your family will follow without thinking about it.
Here’s how to set up a canned goods system that still works three months from now: sort by size first, pick organizers that fit those sizes, fix your wire shelves if you have them, and build a simple rotation so nothing gets buried and forgotten.
Quick Answer: To organize canned goods so nothing expires:
- Pull all cans out and sort by size — small (6-8 oz), standard (15 oz), and large (28 oz)
- Check expiration dates during the sort and toss anything expired
- Pick organizers that match each size group — tiered racks for standard, bins for large
- Add shelf liner if you have wire shelving so cans stop rolling
- Set up FIFO rotation — new cans go behind old ones, always pull from the front
- Run a two-minute monthly check on the back row
Why Canned Goods Are the Hardest Pantry Item to Keep Organized
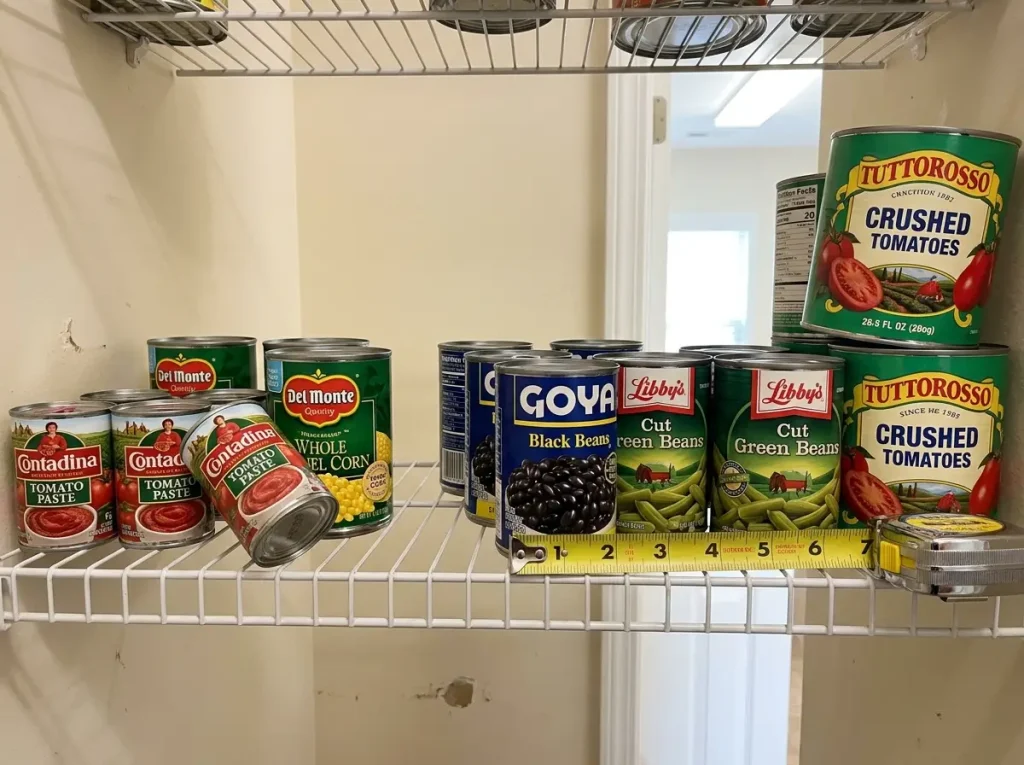
Every other item in your pantry has at least one flat side. Boxes stack. Bags fold. Jars have flat bottoms and visible labels. Cans have none of that going for them. They’re cylinders that roll when bumped, show you nothing but an identical metal lid from the top, and weigh enough to cause real problems on weak shelves.
The Cylinder Problem — Rolling, Stacking, and Label Visibility
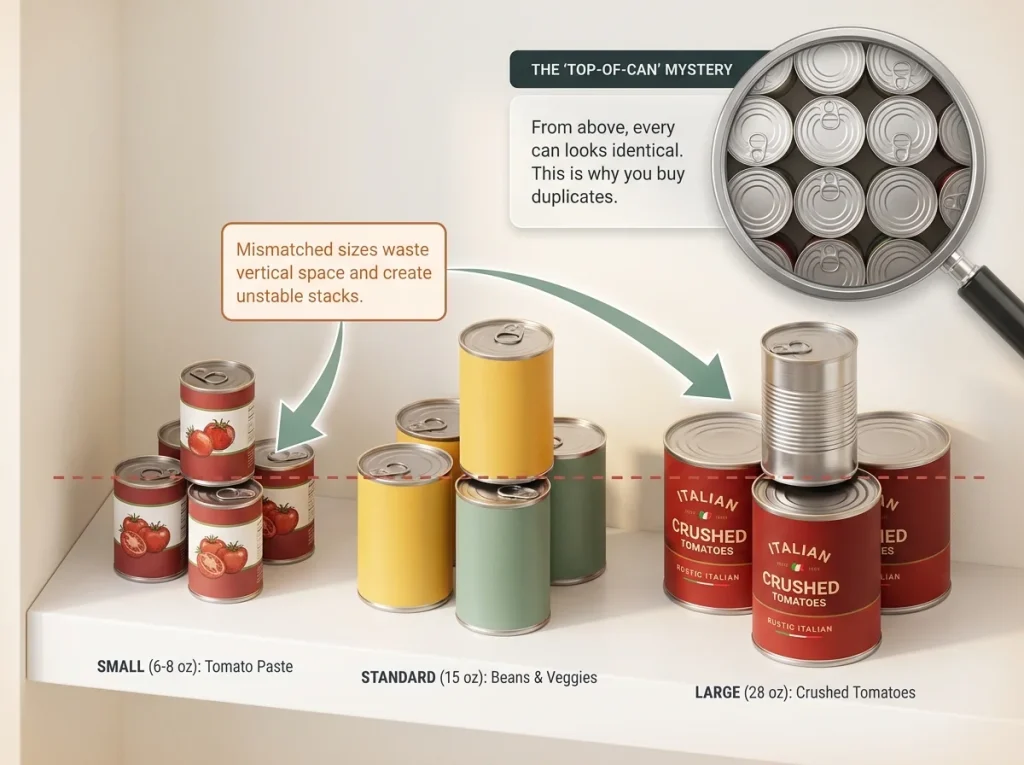
A can of black beans looks exactly like a can of corn from above. The label wraps around the side, but once you stack cans two or three deep, you can only see the front row. Everything behind it is a mystery until you pull cans out one by one.
This is the reason people buy duplicates. You’re not disorganized — you just can’t see what you already have. And because cans are round, pulling one from a tight row sends the neighbors rolling. That “pantry avalanche” where one can triggers a domino effect across the shelf? That’s physics, not carelessness.
Weight Adds Up Fast — What 20 Cans Actually Do to Wire Shelves
A standard 15 oz can weighs about one pound. That seems light until you count what’s on your shelf. Twenty cans of soup, vegetables, and beans is 20 lbs sitting on a single shelf. If that shelf is wire (which most rental pantries have), those 20 pounds concentrate on the thin wire contact points instead of spreading across a flat surface.
Wire shelves are typically rated for 50-75 lbs spread evenly across the full shelf. But cans clustered in one spot create point loads that bow the shelf in the middle. You’ve probably seen this — the shelf sags where the cans are heaviest, and the cans on the edges tilt inward.
Why “Organize by Category” Fails With Cans Specifically
Most guides tell you to group canned goods by category — vegetables together, soups together, beans together. That advice works fine for boxes and bags that are roughly the same size. With cans, it ignores the real problem.
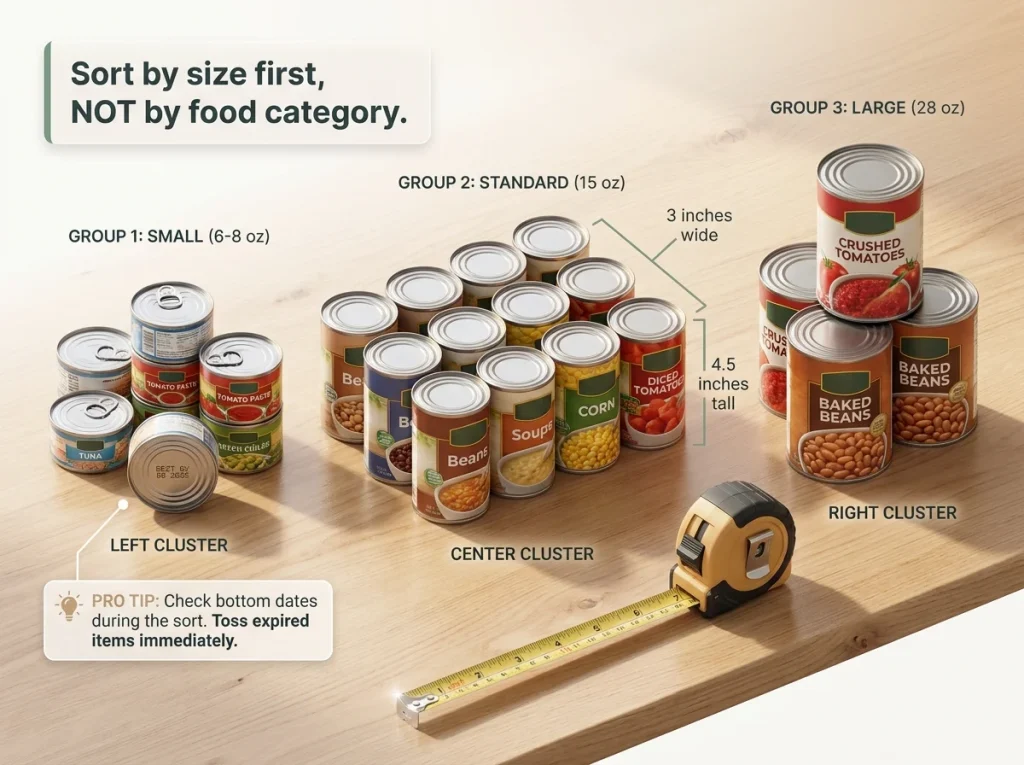
A standard 15 oz can of black beans is 3 inches in diameter and 4.5 inches tall. A 28 oz can of crushed tomatoes is 4 inches wide and 7 inches tall. A small 6 oz can of tomato paste is 2.5 inches across and barely 3.5 inches tall. Try stacking those three together. They don’t fit on the same tier of a can rack. They don’t line up on a shelf without wasting vertical space. Organizing by category puts different-sized cans next to each other, and that’s why the system falls apart after a week.
Sort Your Cans by Size Before You Buy a Single Organizer
This is the step everyone skips. People buy a tiered can rack, load it up, and then discover that half their cans don’t fit because the tier height was designed for 15 oz cans and their 28 oz crushed tomatoes are two inches too tall. The rack looked great on Amazon. It doesn’t work in your pantry because nobody sorted first.
The Three Size Groups Every Pantry Has
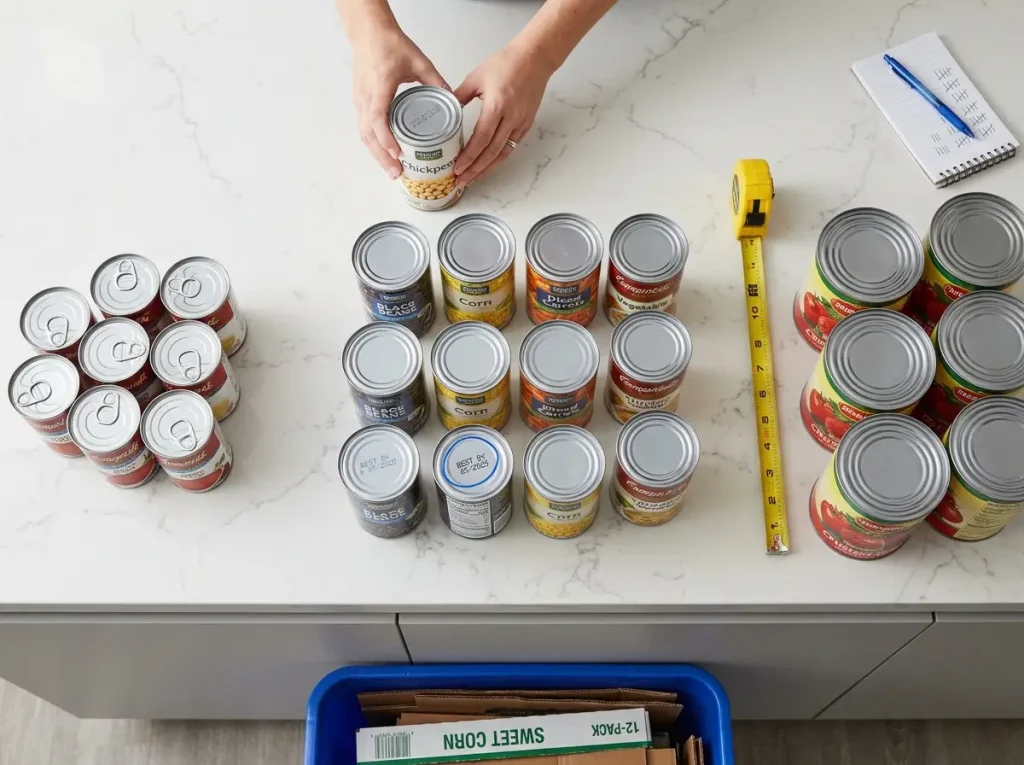
Pull everything out. Every single can. Put them on the counter and sort into three piles:
Small (6-8 oz): Tomato paste, condensed soup, small cans of chilies or coconut milk. These are the ones that get lost behind bigger cans and forgotten. Most pantries have 5-10 of these.
Standard (14.5-15 oz): This is the bulk of your collection. Beans, vegetables, regular soup, canned fruit. A standard can is about 3 inches in diameter and 4.5 inches tall. Most can organizers are designed for this size.
Large (28-29 oz): Crushed tomatoes, whole tomatoes, large cans of beans or fruit. These are 4 inches wide and 7 inches tall. They don’t fit on tiered racks and need their own storage approach.
Count each group. That count tells you exactly what organizer size you need — not the marketing copy on the product listing.
The Expiration Audit You’ll Do While Sorting
While you’re pulling cans out, flip each one and check the date on the bottom. This is where people find the surprises. Five to ten expired cans hiding in the back row is completely normal. Don’t feel bad about it — that’s exactly why you’re doing this.
Toss anything expired. Anything within the next 60 days goes in a separate “use first” pile. You’re going to give that pile a permanent spot on your shelf in a minute.
Pro tip: Write the expiration month on top of each can with a marker before putting it back. Now you can check dates from above without pulling cans out. Takes 30 seconds per shelf and saves you from the dig-and-check routine every month.
Category Comes Second — Sort by Size, Then by Type
Once your cans are in three size groups, then sort by food type within each group. All your standard-size vegetables together, all your standard-size beans together, all your standard-size soups together. But the size group is the primary sort — that’s what determines which organizer each can goes on.
This size-first approach is why your system will last. The organizer fits the cans because you measured first instead of hoping for the best.
Matching Organizers to Your Actual Cans
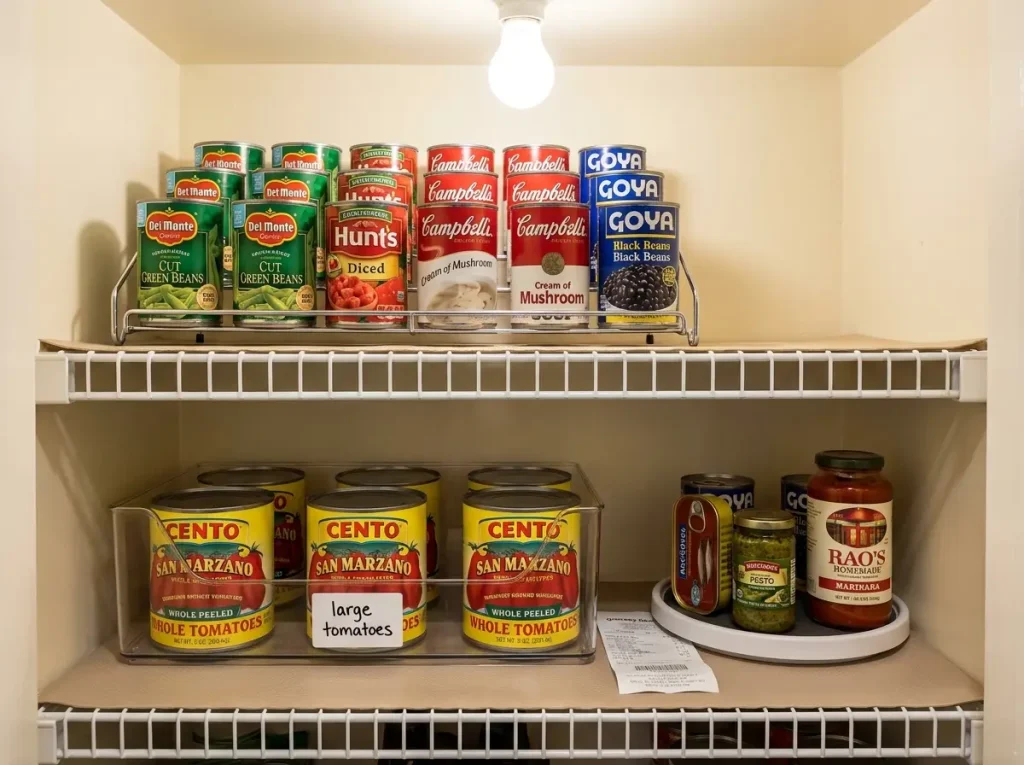
Now that you know what sizes you have and how many of each, you can pick organizers that actually fit. The goal is simple — every can visible, every can reachable, and the system stays put when someone grabs a can in a hurry.
Before you spend money: check your kitchen for free options. Cut cardboard boxes to shelf height and angle them slightly for gravity feed. Magazine holders turned sideways work as single-row can holders. Shoe box lids make shallow trays that keep small cans from rolling. These cost nothing and work fine while you figure out what you actually need.
Tiered Racks and Gravity-Feed Dispensers — What Size Cans Actually Fit
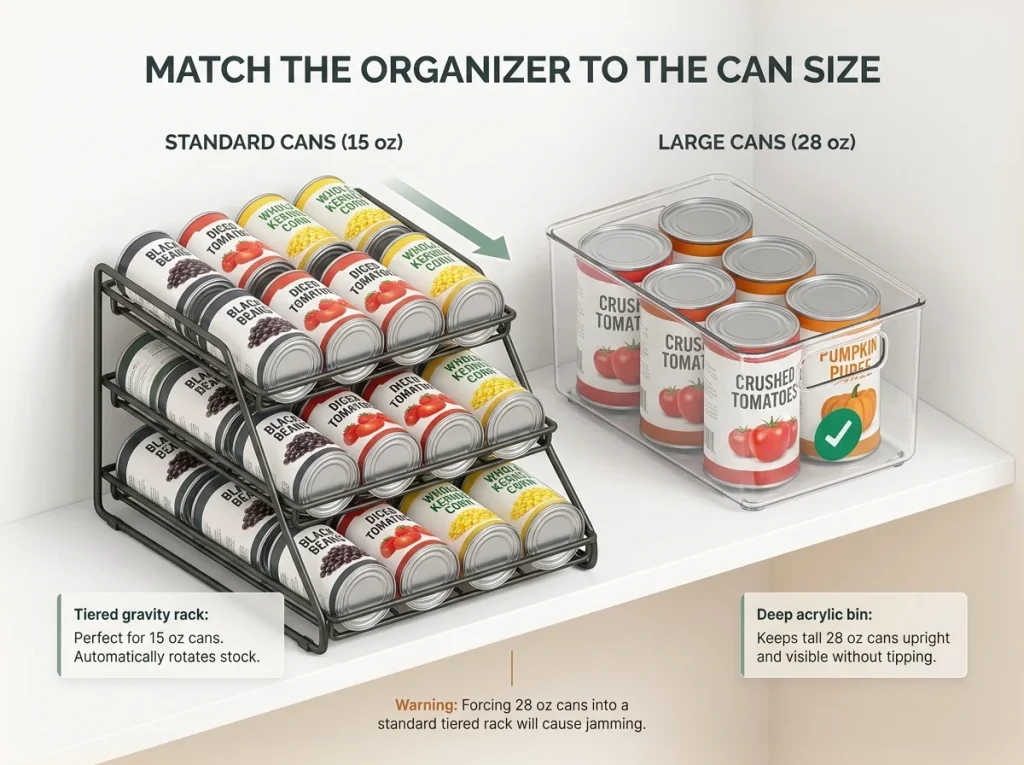
A tiered can rack uses stadium-seating to display cans in graduated rows so you can see every label at once. The SimpleHouseware 3-Tier Can Rack Organizer ($15-18) holds up to 36 standard cans in an 11.5-inch-wide by 15-inch-deep footprint. The gravity-feed design means when you take a can from the front, the one behind it rolls forward automatically. That’s built-in FIFO rotation without any effort.
The catch: the tier height on most racks fits 15 oz cans and smaller. Your 28 oz crushed tomatoes won’t fit. Don’t try to force them — the can tips sideways and jams the whole rack.
For tighter shelf spaces, the mDesign Large Standing Kitchen Can Dispenser ($18-22) is narrower at 5.5 inches wide and holds about 9 standard cans in a spring-loaded column. Good option when you don’t have the 11+ inches of width a tiered rack needs. If you want to skip the purchase entirely, a magazine holder flipped on its side does the same job for one row of cans at the cost of a dollar-store trip.
Bins and Turntables for Large and Odd-Sized Cans
Your 28 oz cans need a different approach. A deep bin with a low front lip lets you stand tall cans upright and see the labels over the edge. Any stackable bin in the 10-12 inch depth range works — you probably have one in a closet already that you could repurpose.
For deep shelves where cans get pushed to the back and forgotten, a Copco Non-Skid Turntable 12-inch ($10-13) puts the back of the shelf within arm’s reach with a spin. The non-skid base keeps cans from sliding off during rotation. One honest caveat: turntables work well for standard 15 oz cans, but 28 oz cans are tall enough to tip when the turntable spins. Keep the big cans in bins instead.
Pro tip: If your pantry shelf is deeper than 16 inches, put your most-used cans on a turntable in the front half and store backup stock in the back half. You’ll reach for the turntable daily and restock from the back once a month.
If you’re looking for a broader system that covers your whole pantry, not just cans, I wrote a guide on matching containers to food types that breaks down which container style works for which category.
Free Solutions That Work Until You’re Ready to Buy
Not every problem needs a product. Cut a cardboard box down to 3-4 inches tall and set it on the shelf as a low-sided tray for small cans. Line up cans single-file in a shoe box lid. Use a binder clip on the shelf edge as a label holder. Rubber shelf liner (even a piece of that rubbery drawer liner you have in the junk drawer) keeps cans from rolling on flat shelves.
These zero-cost fixes handle most of the chaos. Buy organizers later if you want, but start here and see what your pantry actually needs.
The Wire Shelf Fix — Cans on Rental Pantry Shelving
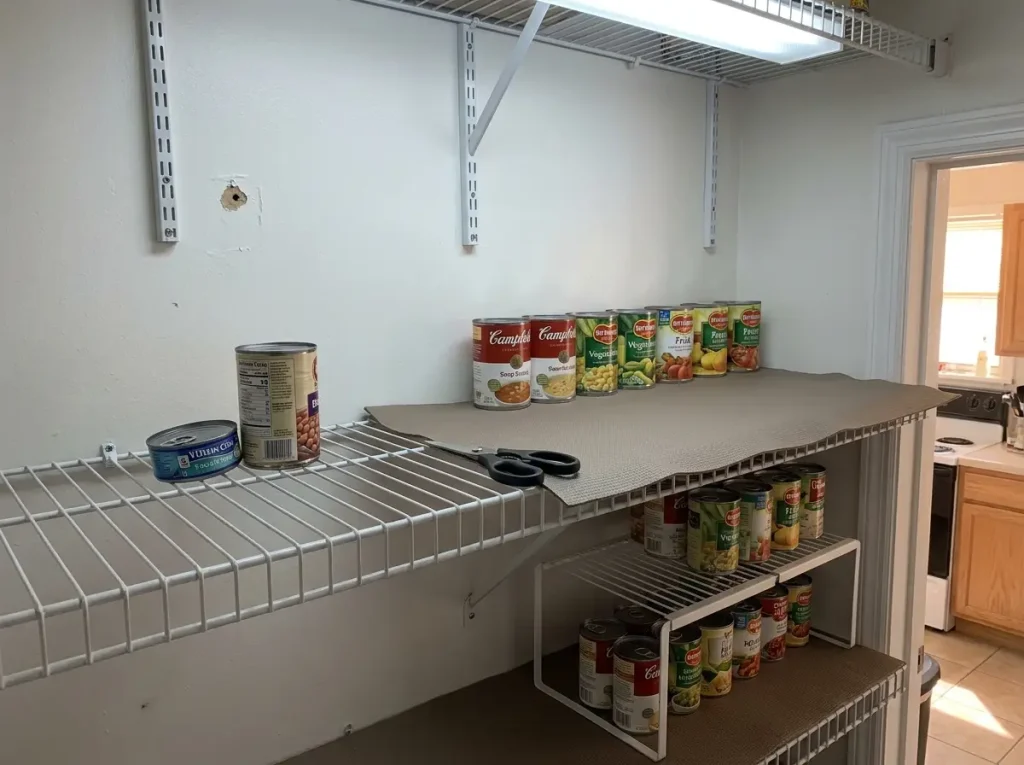
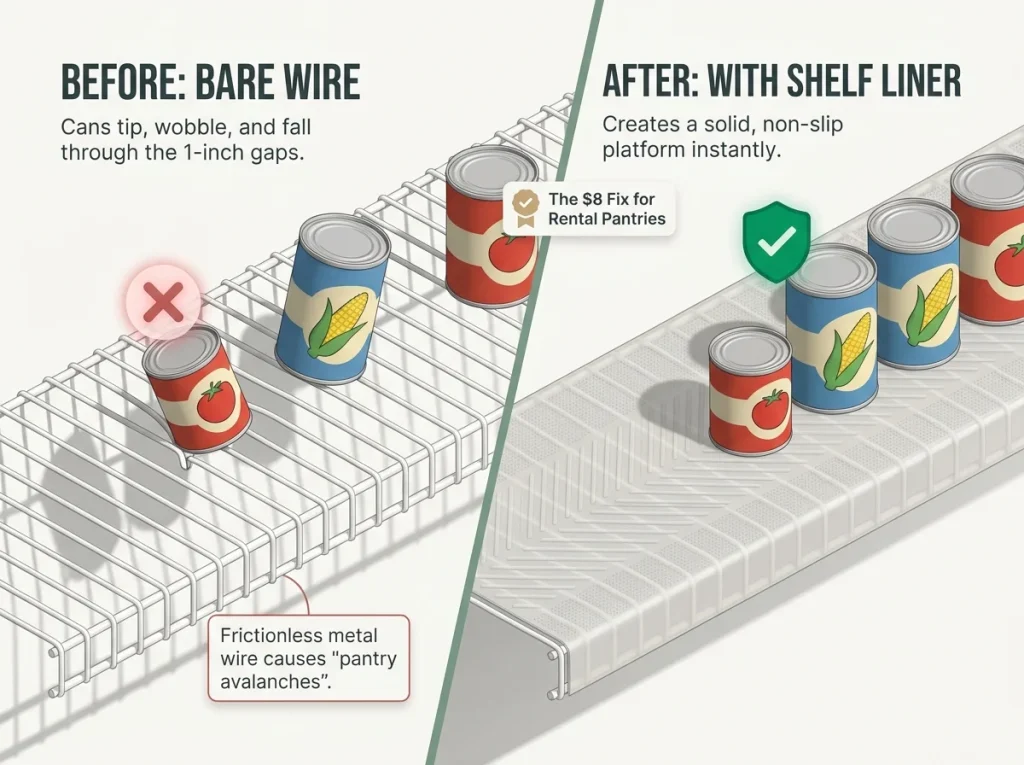
If you rent, your pantry shelves are probably wire. Those thin metal rods with gaps between them are the most common pantry shelving in apartments and rental houses. They’re also the worst possible surface for cans.
A can’s circular base sits on two or three thin wires, wobbles every time you touch a neighbor, and small cans can wedge between the gaps. Add the weight problem from earlier — 20 lbs of cans concentrated on wire contact points — and you get the shelf bow that drives renters to give up on pantry organization entirely.
This has a fix. It costs about $8.
Why Cans Wobble and Fall on Wire Shelves
Wire shelf pitch (the spacing between rods) varies, but most are about 1 inch apart. A standard 15 oz can sits across two or three wires and stays upright — barely. A small 6 oz tomato paste can has a base diameter of 2.5 inches, which means it sometimes bridges only two wires. One bump and it tips between them.
The real problem is friction. Wire gives almost no grip. Cans slide freely, which is why pulling one can from a row sends the rest skating sideways. Every renter who has tried to organize cans on bare wire shelves knows this frustration — the “organized” shelf lasts about two grocery trips before it’s chaos again.
Shelf Liners — The $8 Fix That Changes Everything
The Gorilla Grip Shelf Liner ($8-12 per roll) turns wire shelving into a usable surface. Cut a piece to fit your shelf width, lay it across the wires, and you now have a flat, non-slip platform. No adhesive, no tools, no modifications to the landlord’s shelving. Peel it off when you move.
One roll (12 inches wide by 20 feet long) covers three to four standard pantry shelves. That’s your entire pantry lined for under $12. Cans sit flat, don’t wobble, don’t slide, and the weight distributes evenly across the shelf instead of concentrating on wire contact points.
Pro tip: Cut the liner about half an inch wider than the shelf on each side and fold the edges down over the front and back wire. This keeps the liner from shifting when you slide cans around.
If you don’t want to spend even $8, a piece of cardboard from a shipping box works as a temporary liner. It won’t last as long — cardboard softens with humidity and weight over a few months — but it’s free and proves the concept before you commit.
The Expandable Rack Trick for Renters
For shelves that need more than just a liner, the SimpleHouseware Expandable Shelf Rack ($14-17) creates a second flat tier on top of your wire shelf. It expands from 15.5 to 27 inches wide to fit standard pantry widths and gives you a solid platform at a raised height. Put your daily-use cans on top, backup stock on the wire shelf below.
This is the “shelf on a shelf” approach. It works because you’re adding a flat, stable surface on top of the unstable wire one. Your cans sit on solid material, and the rack’s legs distribute weight across the wire shelf evenly.
For more on organizing a compact pantry with limited shelf options, the guide on organizing a small pantry with limited shelves covers additional renter-specific approaches.
Building a FIFO Rotation So Nothing Expires in the Back
FIFO — first in, first out — is how restaurants keep food from expiring on the shelf. Your pantry has the same problem. Cans get pushed to the back, new grocery runs go in front of old stock, and the can from 2023 lives behind the soup until you find it during a deep clean.
The system works when the rotation rule is spatial, not mental. You don’t need to remember dates. You need to put new cans in the right spot so the oldest ones are always the next ones you grab.
How FIFO Works in a Home Pantry (Not a Restaurant)
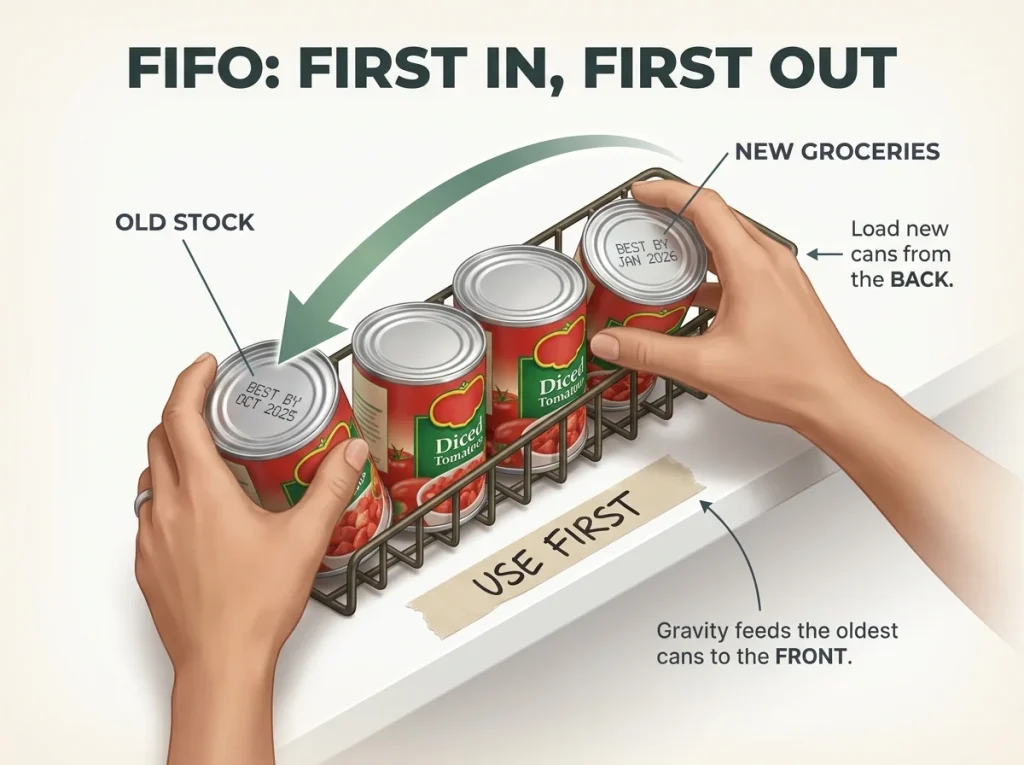
When you put groceries away, new cans go behind or below the existing ones. When you grab a can to cook with, pull from the front or top. That’s it. The oldest cans are always at the front, and they get used first.
If you’re using a gravity-feed tiered rack, FIFO happens automatically. Load new cans from the back of the top tier, and they roll forward as you take from the front. No thought required.
For flat shelves, the rule is just as simple: push old cans forward, new cans go in the back. If every person in your household follows this one rule, you’ll stop finding expired cans.
The Monthly Two-Minute Expiration Check
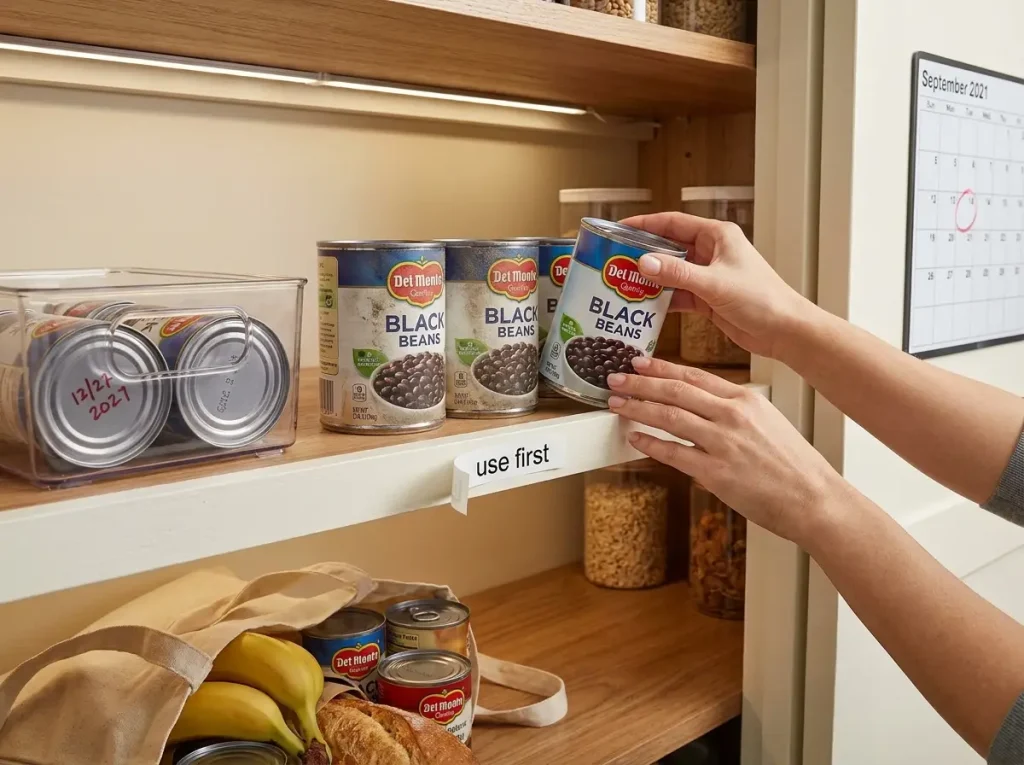
Once a month — pick a day you’ll remember, like when you pay rent or water the plants — pull the front can from each group and look at the one behind it. If anything is within 60-90 days of expiration, move it to your “use first” spot.
Your “use first” spot is one small section at the front of one shelf, or a single bin, where anything nearing expiration lives. This converts invisible expiration dates on the bottom of cans into a visible physical location. When you see cans in that spot, you know to plan meals around them this week.
According to the Utah State University extension shelf life guide, most canned goods stay safe for 2-5 years past the printed date if the can is undamaged and stored in a cool, dry space. The date is a quality indicator, not a safety cutoff. But quality does degrade — acidic foods like tomatoes lose flavor faster than low-acid items like beans.
Pro tip: Stick a small piece of masking tape on the front edge of your “use first” shelf section. Write “use first” on it with a pen. That visual cue is more effective than any app or spreadsheet because you see it every time you open the pantry.
Getting Your Household to Follow One Simple Rule
The rotation breaks when someone in the household puts new cans in front of old ones. This will happen. Don’t build the system assuming everyone will follow it perfectly — build it assuming they won’t, and make the right behavior the easiest behavior.
Put the loading spot (where new cans go) at the back or bottom of the shelf — the inconvenient position. Put the grabbing spot (where you pull cans for cooking) at the front, eye level, easy to reach. People naturally take from the easy spot and put things in the obvious spot. If the obvious spot for new cans is behind the old ones, the system self-corrects.
One household rule: whoever puts groceries away puts new cans behind old ones. That’s the only rule. If your household can follow that one thing, your FIFO system runs itself.
For a broader look at low-cost pantry systems that last, including label and rotation ideas, the budget pantry organization guide covers the full approach for under $15.
Keeping It Together
Three things make the difference between a can system that lasts and one that reverts in two weeks:
Sort by size first, not category. The dimension mismatch between can sizes is why organizers fail. Match the organizer to the can size, and it stays organized because things physically fit where they belong.
Fix the surface before adding organizers. If you have wire shelves, a $8 shelf liner solves the wobble and sliding problem that makes every other solution unstable. Skip this and nothing else you do will hold.
Make rotation spatial, not mental. FIFO works when the rule is physical — new cans behind old ones, grab from the front. No remembering, no checking dates, no app. The oldest can is always the next one you reach.
Three-Month Check: In three months, pull every can forward and look at the back row. If more than two cans have expired, your loading spot isn’t obvious enough — the new cans are ending up in front. Move the “use first” label to eye level and make the back-of-shelf loading point more visible.
Pull your cans out tonight. Sort them into three size piles on the counter. That ten-minute sort tells you exactly what you need — and more importantly, what you don’t.
The full pantry organization system covers how canned goods fit into a complete pantry layout if you want to keep going from here.
Q1 How long do canned goods last past the expiration date?
Most canned goods stay safe for 2-5 years past the printed date if the can is undamaged and stored in a cool, dry place. The date indicates peak quality, not safety. Acidic foods like tomatoes degrade faster than low-acid items like beans or corn.
Q2 Should I organize canned goods by type or by expiration date?
Sort by size first, then by type within each size group. Use a FIFO rotation — newest cans in back, pull from front — so expiration takes care of itself. Sorting purely by date forces constant reshuffling every grocery trip.
Q3 How many cans can a wire pantry shelf hold?
Most standard wire pantry shelves hold 50-75 lbs spread evenly. A 15 oz can weighs about one pound, so one shelf holds roughly 50-60 cans if weight is distributed. Clustering cans in one area creates point loads that cause the shelf to bow.
Q4 What is the best can organizer for a small pantry?
A gravity-feed tiered rack like the SimpleHouseware 3-Tier ($15-18) holds up to 36 standard cans in about 11.5 inches of width. For small pantries, one rack plus shelf liner handles most canned goods without taking over the whole shelf.
Q5 Do I need to take cans out of the box for pantry organization?
Yes. Store packaging hides expiration dates, blocks label visibility, and wastes shelf space with cardboard walls. Remove cans from boxes, sort by size, and place them in your rotation system. Recycle the cardboard.
Disclaimer: ClutterlessNest is a participant in the Amazon Services LLC Associates Program. As an Amazon Associate we earn from qualifying purchases. This article may contain affiliate links — if you buy through them, we may earn a small commission at no extra cost to you. We only recommend products we have tested or genuinely believe in.