









In this article
The rack goes up on a Saturday. It holds beautifully for six weeks. Then one evening it comes off the wall and takes a jar of cumin with it. Most DIY spice organization ideas you’ll find online stop at the finished photo and never show you the version that fell, which is a problem, because the failure is almost never in the build. It’s in the mount, the measurement, or the finish. Below are nine builds sorted by what you actually own, each with the dimensions that matter and the failure point named before you start.
Quick Answer
Build spice storage around your own jars and your own tool level, not around a photo:
- Measure your jars first. Most run 1.8 to 2 inches across, with no real standard.
- No-drill spice rack builds: a tension rod, an adhesive caddy, a zip-tied wire tray.
- With a drill: a wall-mounted spice shelf or a cabinet door spice rack.
- About 4 inches deep by 16 inches wide holds roughly 8 standard jars.
- With a saw: dowel-rail shelves, a tiered spice rack riser, slim door racks.
- Most racks fail at the mount. Grease and heat break adhesive; undersized anchors let go.
Why Most DIY Spice Organization Ideas Fail by Month Three
Every DIY spice rack tutorial shows you the build. Almost none show you that same build ninety days later, after it has lived through steam, splatter, and a cabinet door slamming next to it forty times a week. Once you know what to look at, the failures are boringly predictable, and all three are fixable before you pick up a tool.
Adhesive Fails at the Surface, Not the Strip
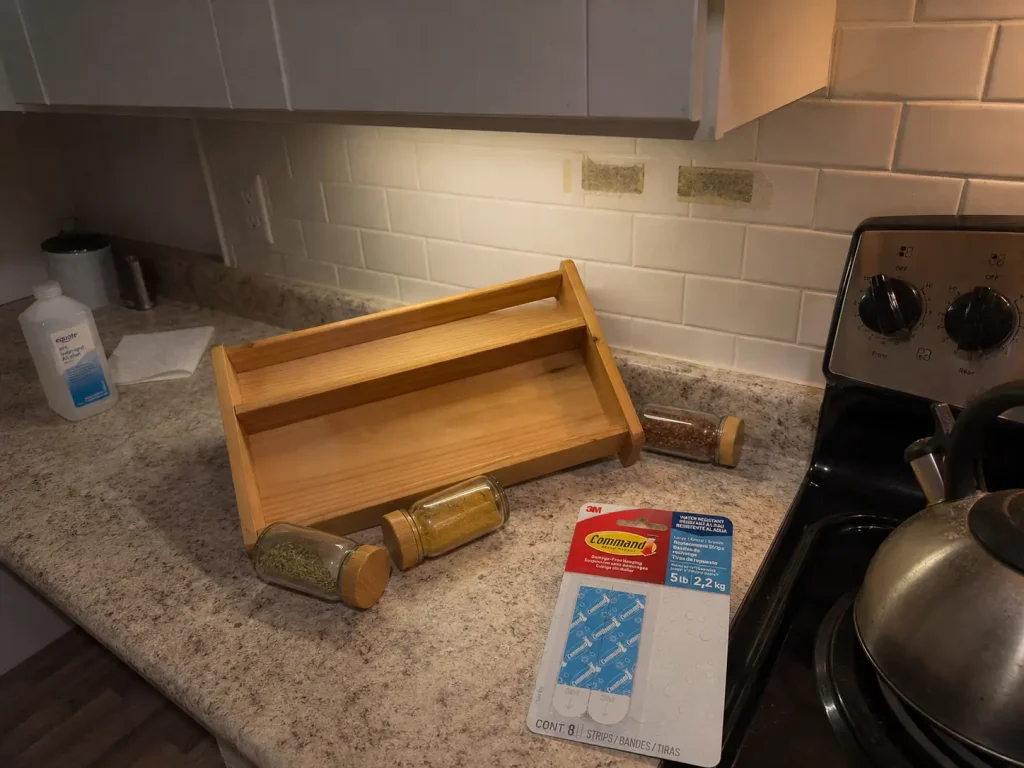
Adhesive failure in a kitchen almost always traces back to the wall, not the product. Two things stack up against a no-drill mount here. The first is grease. Cooking throws a fine film onto every surface within a few feet of the range, and adhesive cannot bond to a greasy wall no matter how hard you press it. The second is heat: the adhesive itself softens above roughly 104°F, which a wall next to a working burner reaches without much effort. Put those together and a strip that would hold a picture frame in a hallway for years gives up in a kitchen in weeks.
That’s worth sitting with, because the usual reaction is to blame the product and buy a stronger one. The strip wasn’t defective. It was in the wrong spot on an unprepped surface. Wipe the wall with rubbing alcohol until the paper towel comes away clean, mount outside the splatter zone, and use the water-resistant line rather than the standard indoor strip. The Command Water-Resistant Adhesive Refill Strips in Large are made for humidity and steam exposure, which is exactly the variable that breaks the standard version. They won’t fix a greasy wall, though. Nothing does except cleaning it first.
Wall Anchors Are a Spec, Not a Default
“Just use an anchor” is not one answer. Basic plastic expansion anchors hold somewhere around 5 to 25 pounds. Threaded anchors handle 25 to 75. Molly bolts land around 25 to 50, and toggle bolts can carry up to 200, according to Family Handyman’s own weight tests on drywall anchors. A shelf holding twenty full jars runs roughly 8 to 12 pounds before you count the shelf itself, and that load sits there for months while a nearby door gets slammed a few thousand times.
So the anchor in your junk drawer is probably rated for a picture frame, and you’re about to ask it to hold a small pantry.
Wood and Paint Lose to Steam
The third failure is slower and easier to miss. Bare wood in a kitchen absorbs steam and swells, and wood warping doesn’t have to be dramatic to matter (a shelf only has to go slightly out of flat before jars start leaning). Painted chalkboard finish chips exactly where jar bases scrape it, which is the whole surface you look at. And paper labels curl above a range, because steam works its way under one edge and lifts the rest.
None of that is a reason to skip a wood build. It’s a reason to seal it before it goes up, which takes twenty minutes and a coat of polyurethane finish.
All three failures share a root: a build that looks finished isn’t the same as a build that lasts. Which is worth remembering before you spend a Saturday on something whose real job is keeping spices findable in the first place.
Measure Your Jars Before You Build Anything
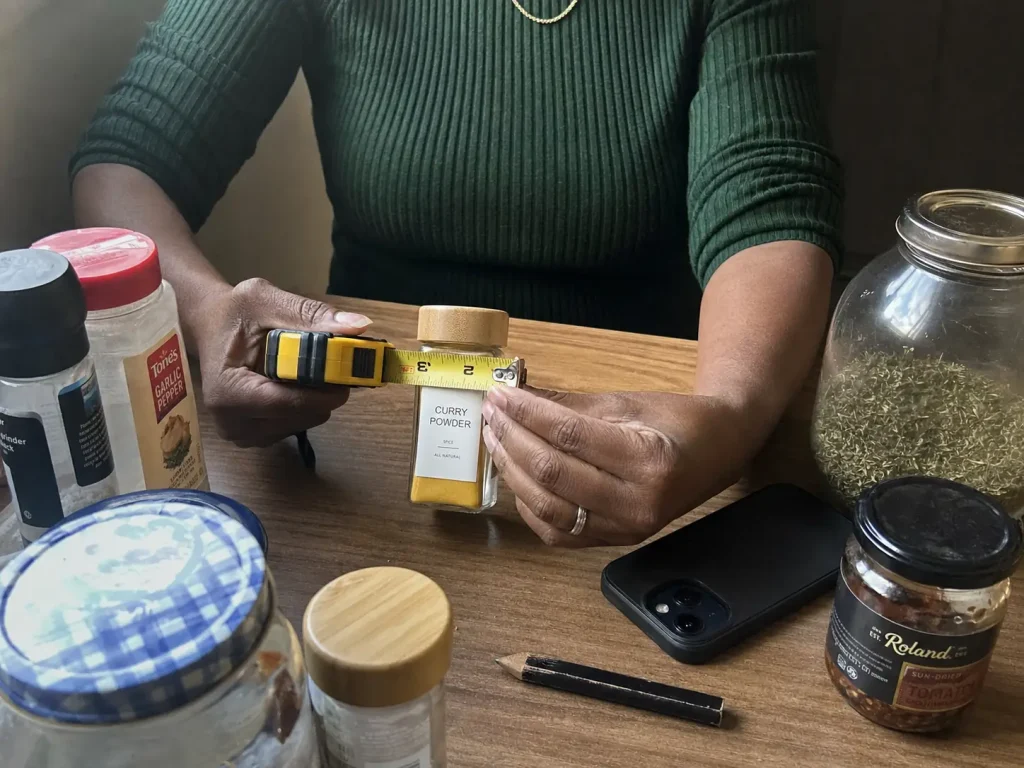
The reason so many homemade racks end up half-empty or jammed solid is that “standard spice jar” is a phrase, not a measurement. Ten minutes with a tape measure before you cut anything is the single highest-return step in this entire article.
There Is No Standard Spice Jar
A 4 oz spice jar generally runs about 1.8 to 2 inches in diameter and 4 to 5 inches tall. But McCormick’s glass jar sits near 1.8 inches wide by 4.5 tall, while IKEA’s Rajtan runs closer to 3 inches across. Build a rack for the first one and the second won’t fit. Most real kitchens hold a mix of glass jars, plastic shaker bottles, refill pouches decanted into whatever was clean, and one oversized bulk container of cinnamon.
Uniform jars are what make every measurement in this article repeatable. That does not mean you need to buy them. Washed pasta sauce and jam jars work perfectly well, and they cost nothing, which makes them the honest first recommendation. The tradeoff is that you end up designing every shelf around your single widest jar and wasting space on the rest. If you’d rather design around one number, a matched set like the AISIPRIN 4 oz glass spice jars with bamboo lids gives you one diameter and one height to work from across all nine builds. The catch is decanting time: expect an evening for a full spice cabinet, and expect to keep the original packets until you’ve labeled everything.
I used to lead with “buy the matched set first.” I’ve backed off that. A matched set only helps if you finish the decanting, and a half-decanted cabinet is worse than the mismatched one you started with.
The Three Numbers to Write Down
Grab your widest jar, your tallest jar, and count what you own today. Not what you plan to own after the next bulk-store trip. Those three numbers decide shelf depth, row spacing, and how many bays you need, in that order. If you’re still deciding between a drawer setup and a wall rack, whether a drawer or a rack is the better fit for your kitchen comes down to the same tape measure, so settle that before you cut wood.
Depth, Bay Width, and Rail Height
Three spice rack dimensions carry every build below. Depth: about 4 inches is enough for a single row of standard jars, and going deeper just creates a back row you’ll forget. Cabinet depth is rarely the constraint here, since a 4-inch shelf fits inside almost any upper cabinet with room to spare. Bay width: 14 inches of horizontal run clears jars, bottles, and cans up to 3 inches across, which makes it a safe minimum for any wall or door build. Rail height: a front rail should clear roughly half the jar’s shoulder height, not the full jar. Build it too tall and you can’t lift a jar out without tipping its neighbors.
For the capacity math, the most useful published benchmark comes from repurposed children’s wall bookshelves: about 4 inches deep, just under 4 inches high, 16 inches wide per shelf, holding roughly 8 standard bottles each, or 32 across a four-shelf set. Nothing else in this topic gives you a number that concrete.
Stand your widest jar on a piece of paper and trace around it, then cut the circle out. That paper disc is your spacing template for every hole, divider, and bay in the build. It beats re-measuring twenty times, and it catches the one jar that’s fatter than you thought.
No-Tool Spice Rack Ideas Renters Can Take Down
Renter-friendly spice storage isn’t a style preference. It’s deposit protection, and “no-drill” is the term renters search for specifically. These three go up in an afternoon and come down at move-out leaving nothing behind but a clean wall.
Idea 1: The Tension Rod Spice Rack
A spring-tension rod wedges between two cabinet walls, or into any narrow gap, and carries a row of jars with zero hardware. Set it low enough that lids clear the shelf above, and load it evenly, because tension mounts fail when weight bunches at one end and the rod walks sideways. An expandable version like the Home in Bold no-drill tension rod shelving is the ready-made take on this if you’d rather not source a rod and a board separately. It won’t work in an opening wider than its rated span, so measure the gap first. If you want the full load math before trusting one, how much weight a tension rod can actually carry covers it.
Idea 2: The Command Caddy
An adhesive mount spice rack has a name in renter circles: a Command Caddy is any small shelf or holder stuck up on strips alone, no hardware, fully removable. Command strip spice organization has one hard rule, and it’s about prep rather than product. Degrease the wall with rubbing alcohol, press the strips for a full 30 seconds, then wait an hour before you load a single jar. Skipping that hour is the most common reason a correctly chosen strip still lets go.
Here’s the version worth knowing about even if you already own a rack: a lot of racks sold as “screw this to the wall” can become no-drill. The IKEA BEKVÄM’s mounting screw slots happen to fit a Command sawtooth picture hanger exactly. One renter went through several types of glue-on strips before that rack came off the wall and broke a jar, and the sawtooth hangers were what finally held it. Check your rack’s slots before you assume drilling is the only option.
Idea 3: The Zip-Tied Wire Tray Riser
Two dollar store wire cooling trays and a handful of zip ties make a tiered display that lifts the back row into view. Scissors are the only tool. This is dollar store organization at its most literal: a Dollar Tree spice rack that costs less than a takeout coffee, needs no wall, and sits on a counter or inside a cabinet.
It also looks like what it is. That’s fine. Cheap spice storage is solving a visibility problem, not a decorating one, and budget spice storage that you can actually see into beats a handsome rack where the cinnamon hides behind the paprika.
One placement rule covers all three: keep adhesive and tension mounts out of the splash zone beside the burners. Inside a cabinet door, on the side of an upper cabinet, or on a pantry wall all stay cooler and cleaner. The same logic that governs the no-drill rules across the rest of your cabinets applies here without modification.
Basic-Tool Builds That Need a Drill and Not Much Else
This is where a lot of roundups quietly change the subject. One major publication files a custom pull-out spice rack and a built-in wall niche under “DIY,” which is contractor work with a contractor budget. Everything in this tier is a drill, a level, and about an hour. If you get partway in and decide building isn’t for you, a ready-made rack that stays put is a legitimate exit.
Idea 4: The Repurposed Children’s Book Ledge
The best repurposed spice rack is one that was already the right shape. A shallow kids’ book ledge runs roughly 4 inches deep, just under 4 inches high, and 16 inches wide, holding about 8 jars per shelf, which is a spice rack in everything but name. Buy one used, sand it, paint it, mount it. The front lip that existed to stop picture books from sliding off is the same lip that stops jars.
Secondhand listings are where an upcycled spice rack gets genuinely cheap, so check those before a lumber run. A small bookcase spice rack works the same way if you can find one shallow enough, though most bookcases are too deep and you’ll lose the back row.
Idea 5: The Bracket-and-Board Shelf
A reclaimed plank on two rated L-brackets is the most flexible build here. You pick the depth (4 to 5 inches is plenty), the length, and the height between rows, which no manufactured rack lets you do. A strip of plywood ripped to width works if you have no plank worth reclaiming, though the raw edge needs sanding and it will not take stain evenly. Seal the board before it goes up.
For the hardware, rated brackets are the half of this build where a stated load number is worth paying attention to, and the HOME MASTER HARDWARE heavy duty shelf brackets in a 10-pack give you enough for several shelves at once. If you’d rather not source a board, a rail system like the Wallniture Turin long wall bookshelf with adjustable brackets lets you move shelf height later, which matters the first time you swap jar sizes. It’s the pricier path of the two and it commits you to the rail’s own bay spacing.
Anchor selection is the whole ballgame in this tier. Match the anchor to the load, hit a stud where you can, and don’t assume the packaging has done the thinking for you. There’s a telling detail in the Consumer Product Safety Commission’s research on wall-anchor strength: furniture anti-tip straps must hold 50 pounds by spec, but the wall anchor holding that strap to the drywall has no minimum-strength requirement at all.
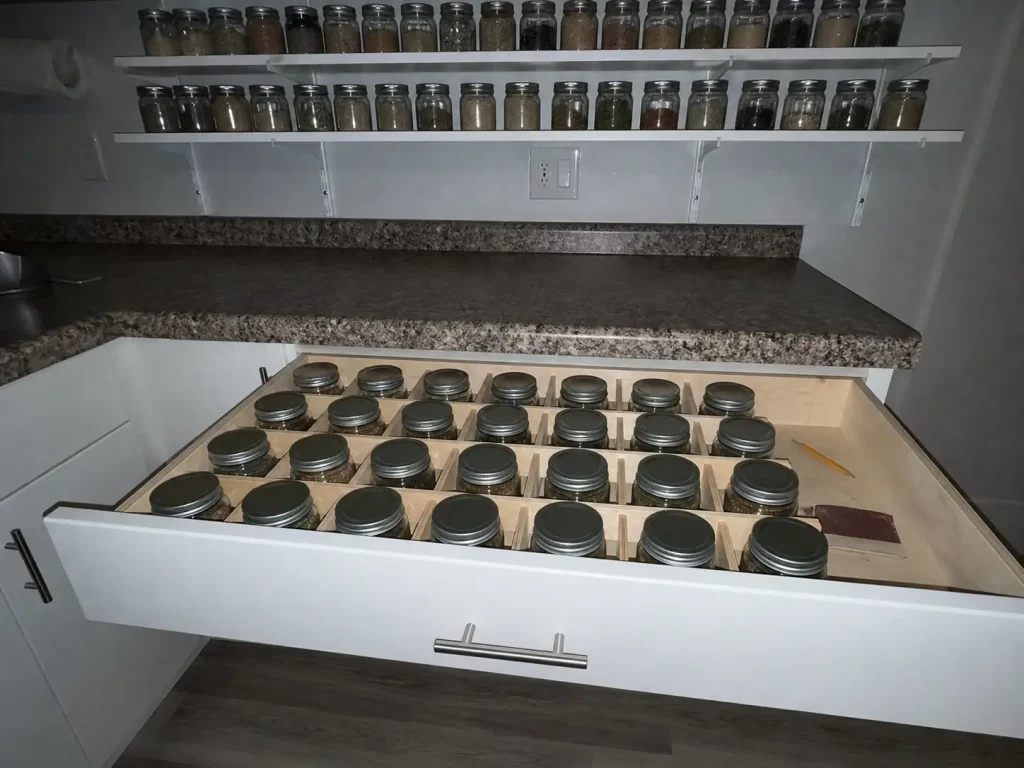
Idea 6: The Mason-Jar Drawer Grid
A mason jar spice rack doesn’t have to hang on a wall. Small jars set into a shallow drawer, held in a grid by thin wood strips laid between the rows, do the same job at counter height. Those strips are your spice drawer divider, they’re the only part that needs cutting, and most hardware stores will cut them to length for you at the counter. Spring-loaded dividers work in place of the wood strips, though most are sized for deeper drawers and will sit proud of a shallow one. Labels go on the lids, because from directly above, the lid is the only face you see.
Drawer clearance is the number people skip. Leave about a quarter inch of finger room around your widest jar in every direction, or you’ll knock two over pulling one out, and that friction is what separates a drawer spice organizer you keep from one you abandon in week three. A strip of shelf liner underneath stops the glass squeaking against the drawer bottom every time you open it. If rolling is your specific complaint, stopping jars from rolling every time the drawer opens goes deeper on the mechanics.
Mount your first shelf lower than feels right. Almost everyone hangs a spice shelf at eye level for the photo, then discovers they’re reaching across a hot burner to use it. Hang it where your hand naturally lands while you’re standing at the counter, and you’ll actually use it.
Woodworking Spice Builds Worth a Weekend
These take a Saturday and produce something that looks bought. Woodworking skill level isn’t really what separates this tier from the last one. It’s owning a saw and being willing to cut to your own measurements instead of a manufacturer’s.
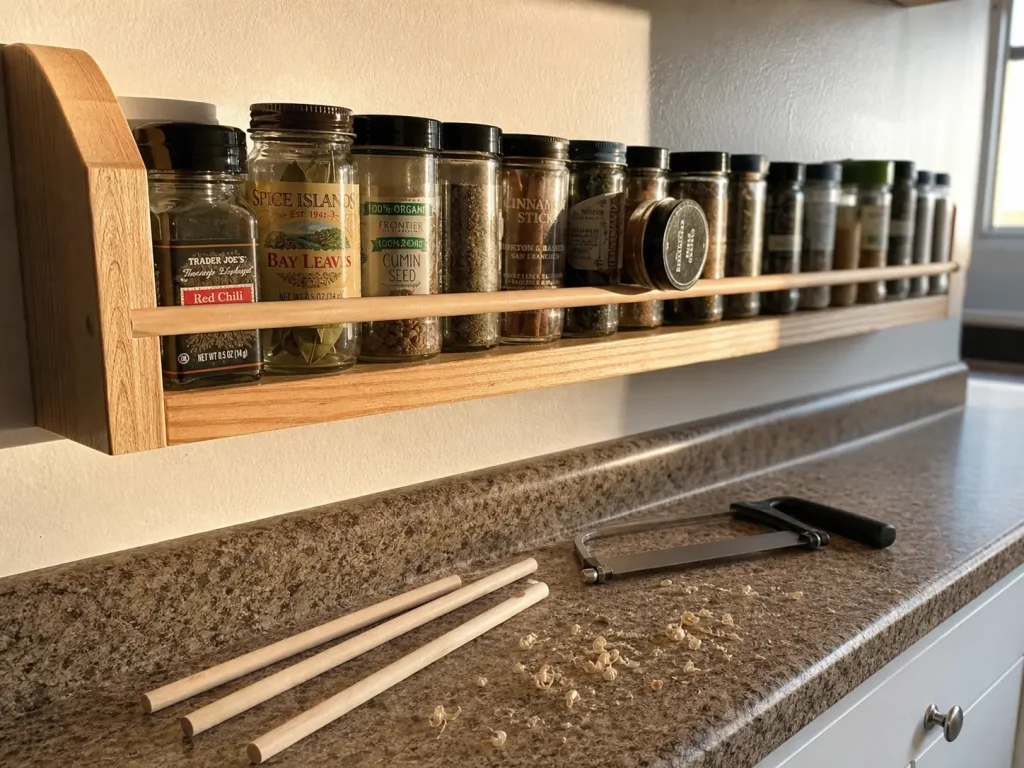
Idea 7: The Dowel-Rail Open Shelf
An open shelf with a dowel running across the front stops jars from sliding off without hiding the labels the way a solid lip does. Drill the rail holes through the shelf’s side supports rather than into the shelf face, so the rail can be pulled out and replaced when it eventually gets grubby.
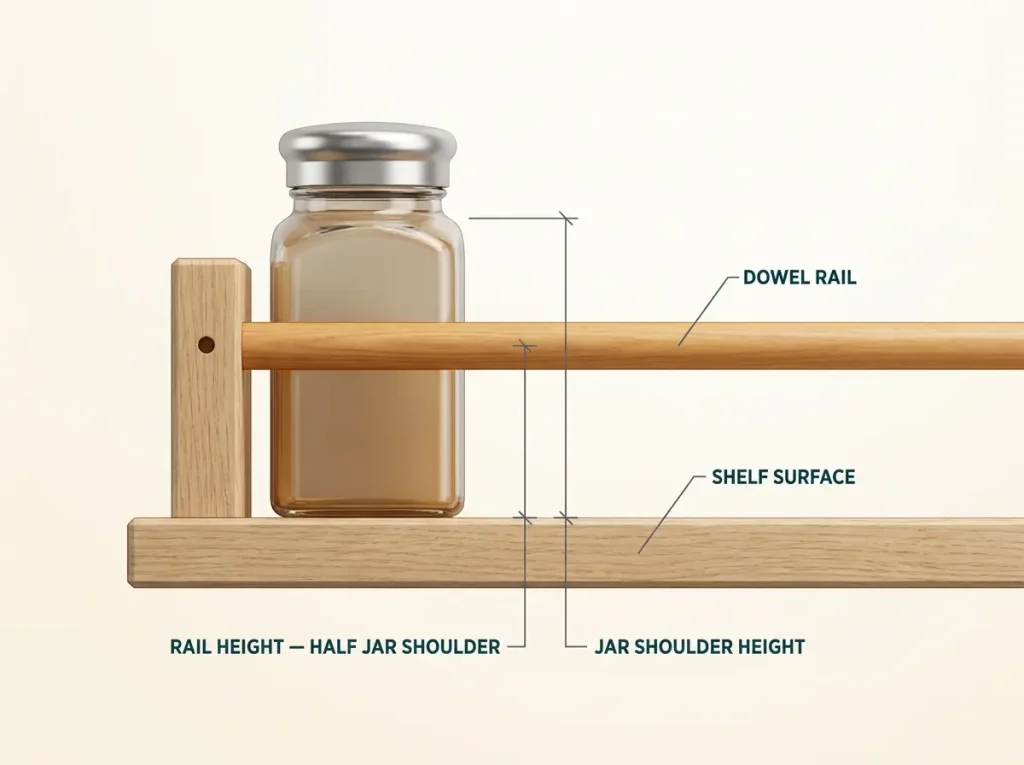
Dowel spacing is the one measurement worth getting exactly right. Set the rail so it clears about half the jar’s shoulder height. With a 4 to 5 inch jar, that puts the rail near 2 inches above the shelf surface: high enough to catch a jar sliding forward, low enough to lift one out one-handed. The 3/8 inch unfinished hardwood dowel rods in a 25-pack are the standard stock for this, pre-sanded and ready for wood stain, and the 12 inch length matches a typical single-bay run so you’re not sawing a long rod down. Chopsticks or pencils will stand in for a true zero-budget version. They work, and they will not hold up as long, because softer wood in inconsistent diameters bows under a full row over a year.
A floating spice shelf with concealed hardware is the same build with the brackets hidden inside the board, and it carries less for the trouble. For shelf depth specifically, how shallow a shelf can go before it stops being useful covers the tradeoff.
Idea 8: The Stepped Riser
A tiered spice rack is three stepped levels cut from scrap pine wood, each step about 2 inches deep and roughly 1.5 to 2 inches taller than the one in front, so the back row’s labels clear the front row. It sits inside a cabinet with no mounting at all, which makes it renter-safe despite living in the woodworking tier. Seal it. A riser lives in a closed cabinet where steam collects every time you open the door mid-boil.
Idea 9: The Slim Cabinet-Door Rack
Building this instead of buying it comes down to one number: your door’s actual clearance. Close the cabinet door and measure from its inside face to the nearest shelf edge, then subtract half an inch. That’s your maximum rack depth, and it’s usually under 3 inches, which is exactly why so many purchased door racks won’t let the door shut. A pantry door spice rack gets more room to work with, since pantry shelves usually sit further back, but the same clearance check that decides whether a door rack fits still decides it.
I used to point people straight at chalkboard paint for these builds, because it photographs beautifully and it’s cheap. After enough threads describing the same chipped edges eight months in, I stopped. Seal the wood, use a real label, and let the finish be plain.
Labeling and Upkeep That Keep the Build Working
The build is the easy part. Whether the system is still in use at month three comes down to two unglamorous things: whether you can read a label from standing height, and whether the finish survives steam.
Labels That Survive a Kitchen
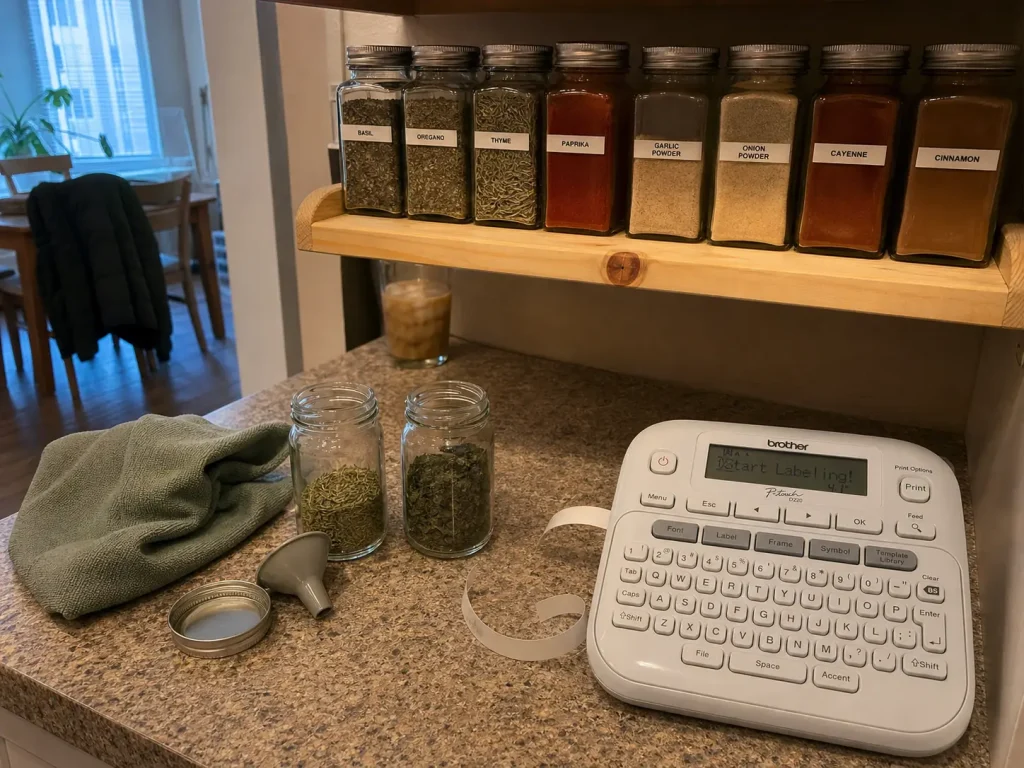
Spice jar labels only work on the face you actually see. Wall shelves and open racks get front labels. Drawer grids and stepped risers get lid labels. Labeling the wrong face is the most common reason a genuinely good drawer system gets abandoned, because a drawer full of unreadable lids is slower than the mess it replaced.
Chalkboard paint chips where jar bases scrape it, and handwritten paper labels curl above a range once steam gets under one edge. Vinyl chalkboard labels give you the same matte look without the chipping and cost very little. Printed laminated tape outlasts both, and a compact machine like the Brother P-Touch PTD220 label maker prints tape that survives wipe-downs and steam. It’s the most expensive labeling option here and overkill if you own eight jars. There’s more on why the cheap options give out in why labels peel off within a month.
Upkeep is short. Reseal wood annually with a light scuff-sand and a fresh coat, which takes twenty minutes and buys years. Then run the three-month test: press-test every adhesive mount, put a hand under the front edge of every wall shelf and lift, and confirm no jar is sitting where you can’t read it. Re-prep and remount anything that gives. If tiering your spending by effort worked for you here, the same tiered approach applied to a whole pantry uses the identical logic at a larger scale.
Label the top of the lid AND the front of the jar on any build you might reconfigure later. It takes one extra minute per jar, and it means moving from a drawer grid to a wall shelf doesn’t cost you an entire relabeling session.
Conclusion
Measure your own jars before you cut, drill, or buy anything. Jar diameter sets shelf depth, rail height, and drawer spacing, and there is no standard to assume on your behalf. Pick your tier honestly, because a tension rod that stays up beats a woodworking build you never start. And mount for the kitchen you actually have, where grease and steam break adhesive that would hold anywhere else and a loaded shelf needs an anchor rated for its real weight.
In three months, press-test every adhesive mount and lift the front edge of every wall shelf. If something gives, the fix is re-prepping the surface or upgrading the anchor, not rebuilding the rack.
Build one shelf’s worth. Live with it for a month. Then decide whether the rest of your spices deserve the same treatment. Small kitchen spice storage starts from a tighter set of constraints, and working with a kitchen that has no spare wall begins there instead.
Frequently Asked Questions
01Which DIY spice organization ideas work without drilling?
Three of them: a tension rod shelf, an adhesive-mounted caddy, and a zip-tied wire tray riser. None of them touch the wall permanently. A screw-mount rack can often become no-drill too, since sawtooth picture hangers fit many racks’ existing mounting slots.
02Do Command Strips actually work near a stove?
Standard indoor strips usually don’t. Cooking grease leaves a film that blocks adhesion, and the adhesive softens above roughly 104°F. Use the water-resistant line, degrease the surface with rubbing alcohol first, and mount outside the splash zone.
03What can I use instead of a spice rack?
A shallow kids’ book ledge, a tension rod, a drawer with wood-strip dividers, or two wire cooling trays zip-tied into tiers. A magnetic spice rack built from spice tins and a steel strip works too, though each tin holds less than a jar. The real requirement is 4 to 5 inches of depth and a way to read labels.
04What size dowel do you need for a spice shelf rail?
3/8 inch hardwood dowel is the standard rail stock. Set it about 2 inches above the shelf surface, roughly half a typical jar’s shoulder height, so it catches sliding jars without trapping them when you reach in.
05What is the cheapest way to organize spices?
Washed jars you already own, arranged on a riser made from two dollar-store wire cooling trays and a few zip ties. Total tool requirement: scissors. It is the least expensive build here and it never touches a wall.